Showing posts with label handmadecardsinmumbai. Show all posts

Thursday, August 30, 2018

Craftangles August blog hop

Hello!
where we are showcasing the most amazing Craftangles glimmer pastes!!
You would have come here from   


Don't forget to comment and leave some love at every stop on the hop...
there are loads of prizes to be won!


Ever since I've tried the Craftangles glimmer pastes, I've been hooked!!
Combine them with Craftangles stencils and you can have a winner every time!


I started off with the Craftangles 'starry lights' stencil and 
Take a look at my process video to see how!


I then added spots of Memento Dandelion ink  around the lanterns for some interest.
I then heat embossed the sentiment (hero arts) and added it to the card panel 
before adhering it to a white square card base.
Fun no?


For the second card, I used the Craftangles 'herringbone' stencil and 
Check out the video below to see how.


I then die cut the panel using Simon Says Stamp stitched square dies 
and added some layered roses from Altenew stamps.
The card looked beautiful so I decided to leave it without a sentiment.


For the third card I used the same Craftangles  Denim blue glimmer paste and 
Take a look at the process video below!


To make the card, I stamped coloured and fussy cut this beautiful plane from 
an unknown stamp set from my stash and added it to the panel that I 
had previously die cut , using Simon Says Stamp stitched squares stamp set.
I finished the card by adding  the sentiment that came in the stamp set.


For the last card, I used the Craftangles 'diamond fade' stencil and 
Check out the video showing how I did it!


I used the little  boy from the newly released 
Craftangles 'Birthday Boy' stamp set for the focal image.
I stamped, coloured and fussy cut the boy and adhered him to the card along with a silver heat embossed sentiment from the same set.
Sweet and simple, no?


I hope you enjoyed these cards as much as I enjoyed making them.
If you have any questions or even if you just liked them, do leave me a comment below.

From here, you now go back to
and leave a comment  there
 in order to win some fabulous prizes!

Thanks so much for stopping by!
Have a great day!

Paru Mahtani
Paru's Perceptions


Saturday, October 28, 2017

Making Christmas cards using Craftangles Stencils.

Hello! 
Today I have a few Christmas cards which I have made using Craftangles stencils.
It was a lot of fun using them in different ways!!


For the first card, I created a background blending together Tim Holtz distress inks and Distress oxide inks on Craftangles grey cardstock.
I then used the Craftangles 'dots' stencil and Hero Arts Unicorn white ink to create interest.
I then added a birch trees die cut, Impression Obsession birds die cut and a torn piece of white paper to create the snow bank.
I finished the cards with Craftangles clear sequins.
I stamped the sentiment using a misti tool and two colours of Tim Holtz distress inks, one on top of the other.


For the second card, I stated by using the Craftangles stripes stencil, first in one direction and then in the opposite direction to create a checked pattern.
I do not have a poinsettia stamp, so I created the poinsettia flower using a single leaf from an old Stampendous stamp set. 
I stamped four leaves, masked them and then stamped them again to create the poinsettia.
I then embossed this flower with gold embossing powder, water coloured it, fussy cut it and popped it up on the background using 3D foam tape.
I added a wooden button in the centre for interest.
I heat embossed a sentiment from Hero arts and a swirl from a Hot of the Press stamp set.


For the third card, I stamped a plaid background onto red cardstock with black ink.
I then created a panel using Craftangles 'leaves' stencil  and Tim holtz distress ink.
and watercoloured some berries among the stencilled leaves.
I then matted this panel on green cardstock and then onto the black plaid bakckground. 
I added a stamped and heat embossed the sentiment on vellum 
along with some Craftangles sequins to finish the card.


For the fourth card, I created a simple red and white background using the Craftangles 'Stripes' stencil and Tim Holtz 'festive berries' distress ink.
I overlaid this background with a  vellum panel with a simple heat embossed christmas tree and sentiment from Hero Arts. I finished the card with some  red self adhesive gemstones to add some sparkle!


For the fifth card, I used the Craftangles 'Stripes' stencil again, 
this time with Tim Holtz 'Black Soot' ink. To create interest, I added some red lines using my red signo gel pen, in between the black stripes. 
I overlaid this panel with a vellum panel attached using black rivets.
I then stamped and die cut the images (Stampendous) and added them to the card using 3D foam tape. I stamped and heat embossed the sentiment onto the vellum and popped up the entire panel using 3D foam tape onto a red cardstock panel and then onto a white card base.


I had a blast making these simple cards..
I hope I have inspired you to give Craftangles stencils a try!!!

Thanks so much for stopping by!
Have a great day!


Sunday, October 2, 2016

Craft Adda New release

Hello!
Have you seen the fabulous new Diwali release 
 from CraftAdda?!
These stamps are superb quality and when stamped the images are super crisp!


I have used some of these gorgeous stamps to create a set of  3"x4"notecards...perfect for the festive season!

I used a range of techniques to make these notecards... masking, rubber stamping, watercolouring, emboss resist and heat embossing. 

For this card, I first gold embossed the rangoli pattern from the 'Festival of lights' stamp set. I then masked off half the card using post it tape and used Tim Holtz distress inks  Fired Brick and Dried Marigold to blend the colours. I used a paisley stamp on the coloured background to create some interest. I finished the card with gold embossed sentiment from the same stamp set.


Thursday, September 29, 2016

ICR discussion on Branding and Marketing

Hello everyone!
I am Paru Mahtani of Paru's Perceptions Handmade Greeting Cards.
I started making handmade cards as a hobby about 18 years ago and have only recently attempted to make it a business.
Asha of Indian Craft Room asked me if I would share some tips and trick that I have learned along the way, to help other crafters with the issues they might face.
It would be my honour to do so!
Today, in my last post,I would like to talk about BRANDING AND MARKETING.
This, I think, has been my biggest challenge!!
Making the card is the really fun part of this journey! Creating a brand and then marketing it is something I've had to teach myself.
My first task was to believe in my product 100%! There were times when others doubted me...there are still those who do...and, there are many many more times I doubt myself.
But, I've taught myself not to give up and to continue to believe in my product...with the help of my ever supportive husband and family!
I then started participating in small exhibitions..and slowly bigger ones. Along the way I grew...in knowledge and confidence.
Today there  is social media...it a lot easier to be seen.But, since everyone has the same idea, I have to make sure I put out quality content on a regular basis. This is how I have created an interest in my BRAND.
I have a style and mostly, I stick to it. Slowly customers have started to recognise the brand.
As for MARKETING, Social Media and digital marketing is the way forward. What's App works very well too!
Here, exceptional photography is the key, since the customer cannot touch and feel the product, the photograph has to convey everything.


Blogging makes me more visible and I often give a set of my cards as gifts to friends. Word of mouth is the good old fashioned way of marketing!
Here are some excellent links with lots of ideas about how to brand and market handmade cards.

I has been my honour to share my experiences with you here and I hope that these discussions have been helpful.
Please leave me a comment...I would love to hear from you.
Thanks so much for stopping by!
Have  good night.
Paru Mahtani

Monday, August 15, 2016

August Coasteride at Indian Craft Room..round 2

Hello!
We at Indian Craft Room are back with round two of inspirations for the August coasteride challenge.


I am the  hostess this month and my challenge is...

 My challenge to you was to create a post card using the storyboard below.


 My challenge to you is to create a project  using only one colour, other than, white, black or kraft.

The challenge will run from the 1st to the 28th of August 2016.


 As always, we have a few rules. Please read them carefully before you play.


1. Follow Indian Craft room

2. Blog about the challenge on your personal blog and link your post back to Indian Craft room.

3. If you do not have a blog, please post about the challenge on social media and link it back to Indian Craft room

4. If you have a blog, download and display this ICR challenge badge prominently on your blog.


5. Display the story board prominently in your blogpost and link it back to Indian Craft Room.

6. Upload your photos to the ICR gallery using the tag name 
                      ICRCSPR01
6. Like ICR on Facebook and Instagram


If you have any questions, or just love what we do,
please feel free to leave  me a  comment below.


Our sponsors for this challenge are the awesome people
at The Craft Shop


Here is my 2nd inspiration for you this month.


To make this card, I started with a piece of bright pink card stock. 
I die cut the Speelbinders Shapeabilities  butterfly from it, creating a negative diecut. 
I dry embossed this panel using a Cuttlebug embossing folder. 
I cut the same butterfly from a piece of  light pink patterned paper from my stash
and inlaid the positive diecut into the negative and adhered it to a piece of white cardstock. 
I then mounted the entire panel onto a white card base and added some sequins to finish the card.
I just love the pop of pink against the white, don't you! 
I hope I have tickled your creative senses with this card and that you will come out and play this challenge!


CoasteRide ends at midnight on August 28th 2016
Don't forget to tag your submissions in the ICR gallery with the tag name 
ICRCSPR02

Now that you have all the details come on over and play along!

Thanks for stopping by!
Have a great day!


Tuesday, May 31, 2016

It's a boy...Craft tangles

Hey there!
I have made a card for CraftAdda today using the "It's a Boy " 6"x6" paper pack from Craftangles.


I used the mama elephant stitched die to cut the square cardstock panel and insert the patterned paper. This card is for my neices inlaws(...my neice just had a baby boy).
I kept the sentiment simple(Hero Arts) but added all the relationships I could think of to create the background. The stamps are from Paper Smooches "Kin Folk' stamp set.
I finished the card with enamel dots from Hero Arts.
 I can't wait for them to receive it!!

I hope I have inspired you to make a few cards too using the awesome papers from Craftangles! You can shop for them here!

Thanks for stopping by!
Have a great day!

Thursday, May 5, 2016

Baby monkey

Hey there!
along with


I took inspiration from Barb Ghig's awesome plaid elephant card to make this card.

I used plaid paper from the Summer Bloom 6"x6" paper pack to die cut the cute Cuttlebug monkey.
I embossed the wahite card topper using the cuttlebug dots folder and inlaid the die cut monkey.
I created a lower panel of patterned paper using the spellbinders scalloped edge die
I tried my hand at handwriting the sentiment on black cardstock for some interest.
I finished the card with some enamel dots from Simple Stories.

Thanks so much for stopping by!
Have a great day!


Monday, April 25, 2016

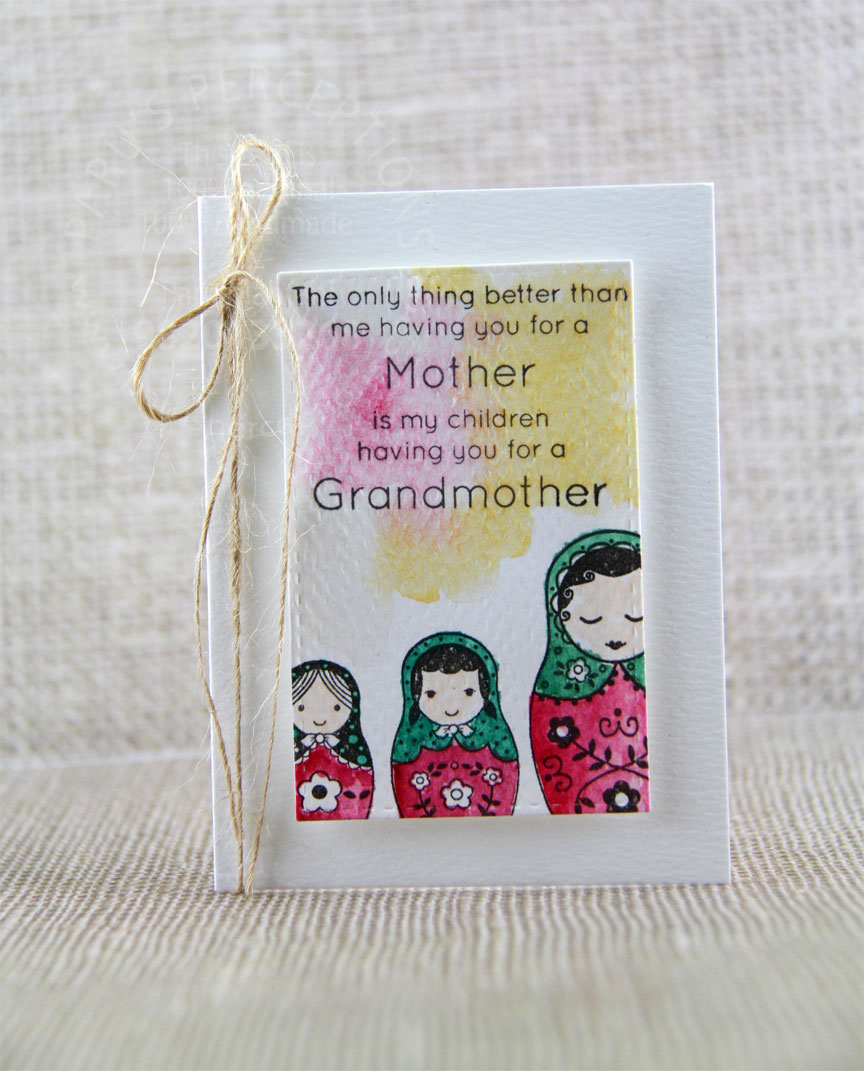
Gramdmother dolls

Finally found  a sentiment (from Simon Says Stamp) to match this gorgeous Doll stamp set from Hero Arts.
Its a quick and simple note card... The card topper is cut using Simon Says Stamp stitched rectangles.
I added a light watercolour wash with Sakura Koi Watercolours and finished the card with May arts jute ribbon.


Thanks for stopping by...Have a geat day!


Happy to call you friend

I am so very happy with this card!
I came upon a new challenge, thanks to my friend Neha Bhatt of Perwinkle creations who was guest designer for the I love Math challenge.


To make this card, I started with some new smooth white card stock that I am trying out...it is great for stamping and as you can see it is great for ink blending too! 
I normally use textured white card stock...this is a nice change.
I blended Mama Elephant's Yellow ink along with memento Tangelo ink and die cut (using Simon Says Stamp stitched circles) the sun/moon. 
I then stamped, coloured and fussy cut the giraffe and zebra from Lawn Fawn's 'Critters on the Savannah' stamp set. 
I placed these on a black card topper and heat embossed the sentiment from Simon Says Stamp in white. 
I love the way it turned out...Its bold and bright and I cant wait to share it with a dear friend!

I am also playing the Simon Says Stamp flickr  'Ink blending' Challenge.

Monday, February 29, 2016

Winnie and Walter Belated 2nd birthday bash challenges 7

Hello All!
I am playing all the Winnie and Walter 2nd Birthday bash challenges today!


With this card I am playing the 

and the 

to make this card, I started with the sequins dies from Papertreyink. I stamped them in rainbow colours to create a background.
I then die cut a vellum panel using Simon Says Stamp Stitched rectangle dies and heat embossed the sentiment and the diamonds from Winnie and Walter's My Precious stamp set on the panel. 
I overlayed the panel on the background and held it in place with a gold brad from recollections.


This is truly one of my favourites!
Thanks for stopping by!
Have a great day!


Winnie and Walter Belated 2nd birthday bash challenges 6

Hello!
I am playing all the Winnie and Walter 2nd Birthday bash challenges today!


Here I am playing the 

and the 

To make this card, I started with a freebie printed paper from Winnie and Walter which I adhered it to a black cardstock panel.
Since my sparkly cardstock was out, I die cut the 2 lamps (from Papertreyink) from it as well as some black card stock for the lamp base.
I also die cut the sentiment from black card stock.
I used a sheet of vellum as an overlay on the printed paper 
and adhered the lamps and sentiment over it.
I finished the sentiment by heat embossing it in gold. (2 words)
The vellum is held in place with 2 black brads from Recollections.


Thank you so much for stopping by!
Have a great day!

Winnie and Walter Belated 2nd birthday bash challenges 5

Hello!
I am playing all the Winnie and Walter 2nd Birthday bash challenges today!


I am playing the 

and the 

to make this card, I die cut Winnie and Walter's 'Party confetti cutaways' in primary colours. 
I then die cut a square panel of white cardstock with the same die, multiple times, going 
over the edge 
each time.
I adhered the white panel to the card base and then inlaid the colourful confetti into the die cut panel.
I die cut a panel of vellum using Simon Says Stamp stitched rectangles  as a base for the die cut sentiment.


I finished off the card with some Pretty Pink Posh sequins.


Thanks for stopping by!
Have a great day!


Winnie and Walter Belated 2nd birthday bash challenges 3

Hello!


Here I am playing the 

and the 

To make this cash gift envelope
I created a background using 'The Big Bold and Extras' stamp set from Winnie and Walter. 
I used Hero Arts Ombre inks fro the flowers and Memento inks for the leaves.
I die cut the Winnie and Walter Congrats sentiment in gold and black and layered it over a piece of vellum to make it pop!
I also stamped matching flowers on the insert.


Thanks so much for stopping by!
Have a great day!


Winnie and Walter Belated 2nd birthday bash challenges 2

Hello!


Here I am playing the 

and the 

To make this card, I have used 2 Techniques. 
Die cutting and Dry embossing

The dies are Winnie and Walter's Maggie's Roses Cutaways. (I used the left over pieces from the die cut outline to make this tag )


The flowers, leaves and the sentiment have been cut from sparkly cardstock from my stash..its so old that I do not remember the source!
I used a cuttlebug embossing folder to add some texture and interest to the background.
The flower centres are made using a Punch Bunch punch.
I finished the card by adding a few Pretty Pink Posh sequins.


Thanks so much for stopping by!
Have a great day!

Winnie and Walter Belated 2nd birthday bash challenges 1

Hello All!
I am playing all the Winnie and Walter 2nd Birthday bash challenges today!


I'm starting with 
and

Here I have made a tag using Simon Says Stamp Stitched circle dies.
The 2 flowers and leaves are left over pieces from 
the Winnie and Walter 'Maggie's Roses Cutaways' die set
You will see the die cut pieces in the card here.
I just loved the look of the left over pieces, so I added some sequins to the centre and used them on this red tag. They really pop don't they! I just love the shimmery card stock too!


Thanks so much for stopping by!
Have a great day!

Monday, February 15, 2016

Second round of inspiration for the mandala and tic tac toe challenge!

Hello!
We at The Indian Craft Room are back with more inpsiration for this months Tic-Tac-Toe Coasterride for you!


This month's hostess is Gopi and she wants to play TIC-TAC-TOE !
She has twist to the game though...you must make a card/project incorporating a Mandala design.

The challenge will run from the 1st to the 29th of Feb.


 As always, we have a few rules. Please read them carefully before you play.


1. Follow Indian Craft room

2. Blog about the challenge on your personal blog and link your post back to Indian Craft room.

3. If you do not have a blog, please post about the challenge on social media and link it back to Indian Craft room

4. If you have a blog, download and display this ICR challenge badge prominently on your blog.


5. Display the story board prominently in your blogpost and link it back to Indian Craft Room.

6. Upload your photos to the ICR gallery using the tag name ICRPREWIN03

6. Like ICR on Facebook and Instagram


If you have any questions, please feel free to leave  me a  comment below.


Our sponsors for this challenge are the awesome people at the Krafter's Cart
They have sponsored a Rs.500 gift certificate from their store.


We're  also announcing a special giveaway for participants who  will play our challenges every month from January to April 2016.


Here is my second round of inspiration for you...


To make this tag, I stamped the Hero Arts background stamp in black and heat embossed it with clear embossing powder ( A trick I learned from Jennifer Mcguire). I heat embossed a love sentiment(from Verna's Creations)in gold on black paper, and, tied the two together with gold and black ribbon.

I have used....ribbon-love sentiment-heat embossing


CoasteRide ends at midnight on February 29th 2016
Don't forget to tag your submissions in the ICR gallery with the tag name 
ICRCPREWIN03


Now that you have all the details come on over and play along!

Thanks for stopping by!
Have a great day!