Showing posts with label may arts ribbon. Show all posts

Monday, April 23, 2018

Mother's day cards using Kraft card and distress inks

Hello!
I am back with a few more cards made using the newly released Craftangles stamps and stencils!
I really had fun with these!

For the first card, I started off with a panel of  Craftangles kraft card, which I coloured using Tim Holtz distess inks (mowed lawn, festive berries and peacock feathers) 
I stencilled over this coloured card base using the butterflies and bricks stencil and Fired brick distress ink from Tim Holtz.
I then stamped the sentiment.. a combination of sentiments from Craftangles 'Happy Mother's Day' and 'Wonderful Mom' stamp sets and words from MFT stamp sets.
I heat embossed the sentiment and added some white paint splatter to create some interest. 
I finished the card by adhering it to a white top folding card base and adding some twine and a butterfly charm.

I followed Kristina Werner's card blending techniques for these cards..not very successfully though!
You can checkout the videos here.


For the second card, I used the same stencil as above, and used a monochromatic palette.
I used Tim Holtz distress inks (crushed olive and mowed lawn) to colour this one layer kraft card base from Craftangles.
I then used Versafine Olympia Green ink to stencil the butterflies.
This ink is a pigment ink so it stained my stencil :(
I should have thought of that before I used it!!

I used Tim Holtz Mowed Lawn distress ink to stamp the sentiment 
using my Misti. 
I then off set the card by just a little bit and stamped the sentiment again with Versafine Onyx Black ink, in order to create some dimension.
I added some enamel dots (fro Let'z Craft) and twine and a butterfly charm to finish the card.


For the third card, I used Tim Holtz Festive Berries and Dusty Concord distress inks.
I then placed the stencil over the coloured card base and used the Dusty Concord ink some more.
This created a beautiful effect.
I added some silver acrylic paint splatter , a white heat embossed sentiment 
and some silver thread, to finish the card.


For the last card, I stamped the Supergirl image from Craftangles 'Super Girl' stamp set, 
but modifed the hair to make her look like a mom!
To do this, I inked up the stamp and then wiped off the ink on the pigtails before stamping. 
After stamping, I used a black marker to create the hair.
I wanted the image to represent a Super mom!
I decided to create a frame to frame the Super Mom. 
So I used Queen and Company's oval frame die to cut out a black frame. 
I order to add some dimension, I stacked 3 frame die cuts. 
I embossed the top die cut to create some interest.
To create the background, I stamped the sentiment using Tim Holtz 'Brushed Cordruoy' distress ink, on Craftangles Kraft card stock, to create a tone on tone look.
I then stamped the main sentiment (Craftangles Happy Mothers day stamp set) in black over this background. 
Once I added the framed image, I added the word 'Mother' (heat embossed in white on black cardstock).
I then adhered this panel to a white top folding card base and finished the card using gold and silver star sequins from my stash.


I hope you enjoyed reading about my process, 
and will give these stamps and stencils a try.
Thanks so much for stopping by!
Have a great day!


Tuesday, July 4, 2017

Playing with Craftangles patterned papers.

Hello!
for my DT post today, I am using the Craftangles 'Enchanted blooms 2' paper pack to make some pretty birthday cards!
I have combined patterned papers from the newly released 'Enchanted blooms 2' paper pack 
with papers from the previously released 'Felicity' paper pack. I have added some of the new Craftangles 'cupcake pink' sequins to add some sparkle.
Today I decided to use outline sentiment stickers (remember them?) on my card instead of stamping or die cutting. The papers are so pretty by themselves that I have kept the embellishments to the minimum.
I hope you like these cards and will be inspired to check out these beautiful paper packs for yourselves!


Thanks so much for stopping by!
Have a great day!

Thursday, December 15, 2016

Indian Craft Room Blog Hop. Christmas Cards

Hello everyone!
Welcome to the ICR Blog Hop!
It has been a wonderful year at ICR and we are ending the year with a blog hop by all the 
team members who were creating for ICR this year!

For this blog hop, we are creating cards with 
any type of EMBOSSING.
It could be heat embossing (wet embossing) or,
 embossing with an embossing folder (dry embossing)


You would have come here from 
Gopi's blog..

I have a set of 5 christmas cards to share today.
I have used both wet and dry embossing techniques on all the cards. 
I hope you enjoy reading about them as much as I enjoyed making them!!


For the first card, I doodled four christmas trees, 
painted them using Sakura Koi watercolours and fussy cut them. 
I then cut the snow bank using Mama Elephants's landscape trio dies and,
 embossed the background with Cuttlebug embossing folders.  
I then placed the background panel on a 5"x5" red card stock base.
I finished the card with a sentiment from Hero Arts and a bit of jute twine from MayArts.


I have seen versions of this card  a lot on Instagram and Pinterest, and, 
I was inspired to try making my own.
I embossed the background panel with a Cuttlebug embossing folder and, 
blended Memento Summer Sky ink onto it.
I stacked three stitched circle die cuts one on top of the other and 
added googly eyes, a shiny gemstone for the nose and a doodles smile.
 I then added twigs, (die cut using Memory box dies)
 for the arms and a doodled and coloured scarf.
I then placed the panel on a red card stock base and
added a sentiment from Hero Arts to finish the card.
I love the feeling of breeze, when I see this card


I particularly love this card! 
I learnt how to colour the Holiday Bow from the Ton stamps, 
The rest of the card is simple..
A Cuttlebug embossed background panel and,
 a gold heat embossed sentiment on vellum finish the card.


I doodled another three Christmas trees, coloured and cut them for this card. Again, I used the Mama Elephant landscape trio dies to create the snowbank and Cuttlebug embossed the background.
I finished the card with sentiments from Hero Arts and jute twine from May Arts.


For this card, I Cuttlebug embossed swirls on the background panel, to begin with.
I then stamped and heat embossed and fussy cut two cups from 
the Paper Smooches 'Cyber Cafe' stamp set. I placed the cups on a vellum panel on which I had heat embossed the heat swirls in white embossing powder. I then hand stitched the panel onto the card base. I added a gold heat embossed sentiment and some green Bakers Twine to finish the card.


I hope you enjoyed reading about these cards, and I hope you are inspired to create some of you own this season! 
Do leave a comment..I'd love to hear from you!

Next on the hop is the lovely Pratyusha..head on over and leave her some love!

We have some awesome prizes in store for you...

a bag of goodies  (dies, stamps, etc.)
from


Don't forget to link up your creations here and leave a comment on all the blogs!

                            Paru<---- You are here
                       Pratyusha<----Next blog


Thanks so much for playing along...
Have a great evening!!

Sunday, November 13, 2016

50th birthday shaker

 Hello !!

I am back with another shaker card...well, I am creating  shaker cards all this month, so you will see more in my next post too.

I made this card for my dearest cousin for her 50th birthday.
I used  a sheet from the Craftangles 'Pyari Ma' paper pack as the base of this card.
To create the shaker, I  stacked a few scalloped circles, 
covered them with acetate and created a well for the shaker elements. 
I then covered the other side too with acetate to create a see through shaker. 
The stack is no visible as it is on the inside of the card...actually this was a mistake I made..
but, doesn't look too bad, does it?


I had some number confetti in my stash which I added along with some rainbow coloured  and assorted sequins.


I finished the card with a die cut sentiment from Winnie and Walter. 
I ran this die cut sentiment through my Xyron sticker machine and adhered it to the acetate. 
The number die cuts are from Lawn Fawn's Quinns 123 die set.
I also stamped a sentiment on the inside of the card, which is visible through the shaker.

My cousin loved her card...hope you like it too.
Thanks for stopping by..
Have a great day!
Paru Mahtani


Tuesday, November 1, 2016

Cards for children Challenge

Hello everyone! 

Welcome back to all of you who have played my challenges before 
and a big welcome to those who are stopping by for the first time! 
I hope you have great fun playing  along!

November 14th is the birthday of our first Prime Minister Pandit Jawaharlal Nehru. 
As he was very fond of children, It is celebrated as Children's Day in India.
Therefore, the challenge for the month is to make a card or tag for CHILDREN.


HOW TO PLAY

Make a card or tag using the theme given. 
Take a photo of your creation and link it up below.
If you have a blog, write a post about our challenge and link it back to our challenge, including photos of your card or tag.
Please display this storyboard prominently in your blog post so that others may be inspired to play.

ALSO, please display this logo prominently on the sidebar of your blog so that others may join us.


FOLLOW/JOIN  THIS BLOG
 FOLLOW US ON FACEBOOK AND INSTAGRAM AND TAG YOUR SUBMISSIONS ON SOCIAL MEDIA WITH THE TAG
#PCMCHALLENGES

If you don't have a blog, post your photos on social media and TAG them with #PCMCHALLENGES
If you don't tag them, we will not see them on social media.

Link your blogpost/social media post to the linky below.


Now for some inspiration...

This month our sponsor MHK designs 
has shared some beautiful digital papers and stamps with us,
which we  have showcased.

I started with the papers from the Autumnal Accents digital paper pack
 and added the digital stamps from the Butterfly wisdom set.
I coloured the butterfly to make it pop, using faber castell colour pencils and then added the sentiment which I printed on vellum.
I finished the card with some MayArts jute ribbon.


For this tag, I used the same papers and stamps as above and
 added a dry embossed panel and some self adhesive gemstones for interest.
I finished the tag with charcoal bakers twine from the Twinery.


For the Instagram inspired shaker card, I have used the papers from the
I created the shaker element by die cutting  and stacking multiple circles using 
Simon Says Stamp Stitched circles die .
I added some silver and gold star confetti and closed the shaker element using the same patterned paper as the background. 
I added a spellbinders nested heart and 
a speech bubble from Simon Says Stamp 'Talk bubble' die set.
The birthday sentiment is from Stampendous.


I really enjoyed using these beautiful bright colours on the cards..I think kids would like them too!

For more inspiration...

We have La Von Hall over as our guest designer this month! 
La Von and I became friends through Flickr, 
where she runs an awesome group and challenge every month. 
Do drop by and leave her some love!


I am so very honored to be chosen as the guest designer this month for Paru's Card Making Challenge. Thank you very much, Paru!  The theme for this card is children because the birthday of Pandit Jawaharlal Nehru is celebrated as Children's Day in India. India's first Prime Minister, Pandit Jawaharlal Nehru, was born on November 14. Apart from being known for his skills as a statesman, Nehru was also immensely fond of children.

The card I created for Paru's Challenge is a shaker card.  I think children of all ages like shaker cards.  The wonderful sponsor that Paru has chosen for this month is MHK designs. All of the digi images, sentiment and even the patterned papers are found at the MHK designs.  I used the "Hardy Party" digital paper pack and "Eat Your Cake" digital stamp set.


Making a shaker card is simpler that it may look.
  • I colored the image with Copic markers and added a touch of shimmer using a bit Multi Media Matte with clear glitter.    
  • I cut the frame 6 times, 5 times from plain cardstock and one time from the patterned paper.  The five cardstock frames are glued into a stack to create the well for the shaker mix.   
  • Place the stacked frame over the colored image where you like and trim off any excess.  Glue the frame over to the image using the Multi Media Matte. 
  • After the glue is dry you put in the sequin mix.  
  • Next you will cut a piece of plastic or acetate cut to size and adhere this over the window.  I like to use a strong double sided tape like SCOR-tape to adhere the acetate to the frame and the patterned paper.  It seems to work the best. 
  • Then adhere the assembled shaker to your card.  
I was have such a great time with the pretty papers from MHK that created two tags for the challenge.  After making both I couldn't really decide which I liked best so I am sharing both here.   Both of my tags use a die from Hero Arts.  I will list my supplies below.
I was have such a great time with the pretty papers from MHK that created two tags for the challenge.  After making both I couldn't really decide which I liked best so I am sharing both here.   Both of my tags use a die from Hero Arts. 


I hope that you are inspired to join in the challenge this month to celebrate children.   Thank you, for stopping by my blog.  Your comments, questions and suggestions are always welcome.


THE PRIZES

As always, we have  fabulous sponsors lined up for this month.

Up for grabs are...

 3 items of the winners choice from 


and 

a $25 gift card from So Suzy Stamps


We hope you have been inspired to create some beautiful cards for CHILDREN!
Can't wait to see your creations!

I will announce the winner of this challenge on the 28th of November, so don't forget to stop by!

You can link up your creations below.

To be eligible to win a prize, please follow all the instructions carefully...
you will find them above and in under 'how to play' in the right sidebar.


Thanks so much for stopping by...
Have a great day!

Paru Mahtani


Sunday, October 2, 2016

Craft Adda New release

Hello!
Have you seen the fabulous new Diwali release 
 from CraftAdda?!
These stamps are superb quality and when stamped the images are super crisp!


I have used some of these gorgeous stamps to create a set of  3"x4"notecards...perfect for the festive season!

I used a range of techniques to make these notecards... masking, rubber stamping, watercolouring, emboss resist and heat embossing. 

For this card, I first gold embossed the rangoli pattern from the 'Festival of lights' stamp set. I then masked off half the card using post it tape and used Tim Holtz distress inks  Fired Brick and Dried Marigold to blend the colours. I used a paisley stamp on the coloured background to create some interest. I finished the card with gold embossed sentiment from the same stamp set.


Saturday, September 10, 2016

How I photograph my cards

Hello!
I am back with another post for Indian Craft Room...this time about Photographing Greeting Cards.
Apologies for not posting yesterday, as promised!
I'm Paru Mahtani, an avid cardmaker and photogrpahy enthusiast. My passion for  card making led to a need to photograph my work; hence developed an interest in photography. Once I started exploring this hobby, it became addictive!
There are so many good blog posts, video and discussions on the internet about photographing you cards/crafts/art work. Thanks to the popularity of online shopping, crafters have realised the tremendous importance of photography!
The lessons I have learnt in my 15 plus  years of making cards are...

1. Research!! Research!! Research!!
Read blogs, look at others photos, read what they say about their photography processes, look at photos on Pinterest and Instagram and learn! 
Here are some resources:


2. Take a few photography classes to earn how to master your camera. 
Then you can create some amazing photos.

3. If you have a spot with great natural light, that's fantastic! If like most people, you don't, make an inexpensive lightbox (learn how to make one here.) and learn how to use it! 
The results are amazing!!
Here is an image of my set up...it's not perfect (the light box is a little wonky) 
but the results I get are just fab.

I have set it up at a height so that I don't have to bend. I have a put a little side table on top of my dining table and then placed the light box on top of it.
The lights are 'Sonia Trilights'. They have an adjustable stand and it is continuous  white light.
These are photography studio lights, but the same can be acheived with any continuous light.
I use a Canon 7D dslr, but very often take photos with my iphone if I dont have time to set up the light box.
I usually make a bunch of cards and  photograph them all together.


Here is the result!


These are photos taken on my desk with an iphone...


I hope this post has been useful and you have been inspired!! Do leave me a comment...I'd love to hear from you!
Thanks so much for stopping by today!
I will be back next Thursday with another post.
Have a great evening!

Wednesday, September 7, 2016

Autumn harvest papers from Craftangles

Hey all! I am on the CraftAdda blog today with a couple of cards made with the awesome new 6"x6" Autumn Harvest paper pack from Craftangles! 
You can see a flipthrough of this paper pack here!
The papers are gorgeous...thick and luxurious to work with. 
The patterns work well with each other, as you can see.


The card techniques  are pretty much self explanatory.
I used the "Landscape trio" die from Mama elephant to add some interest as well as the feather dies from Simon Says Stamp and the gold heat embossed sentiment from 'Paperwishes'. 
The jute twine is from MayArts ribbon.

Come on over to the CraftAdda store and check out all the awesome patterned papers!!

Thanks for stopping by!
Have a great evening!


Monday, April 25, 2016

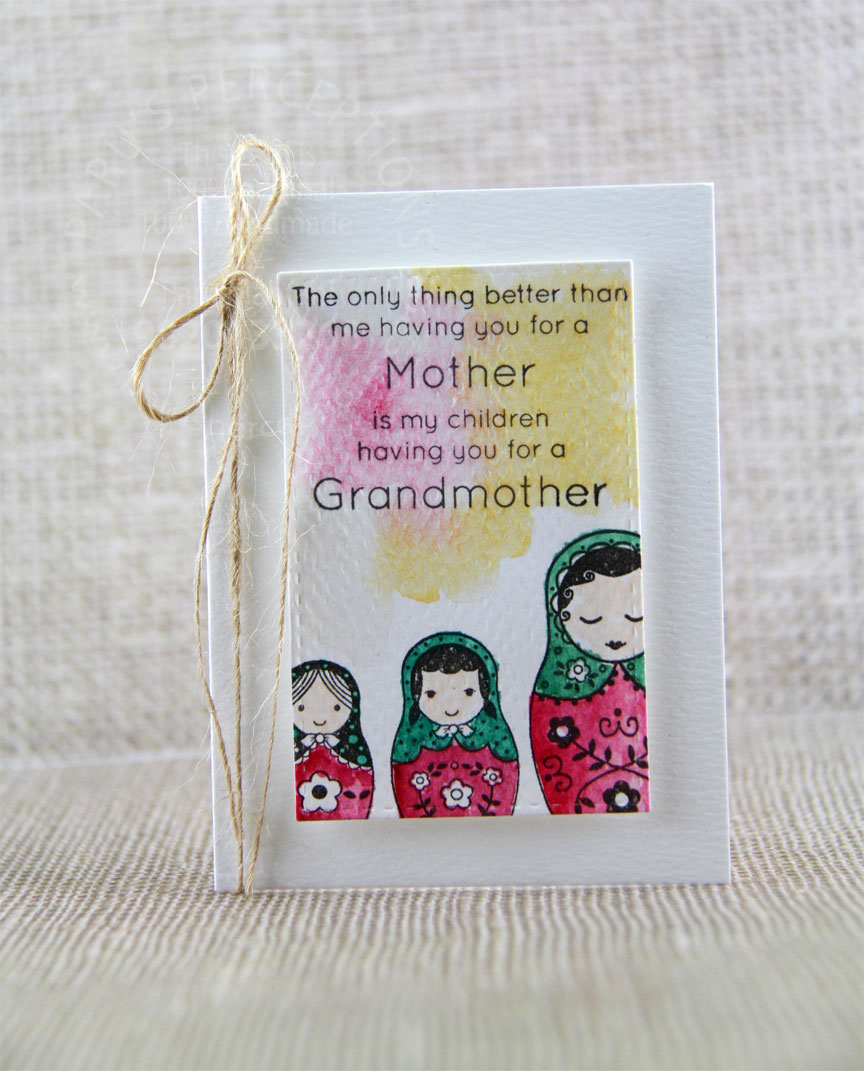
Gramdmother dolls

Finally found  a sentiment (from Simon Says Stamp) to match this gorgeous Doll stamp set from Hero Arts.
Its a quick and simple note card... The card topper is cut using Simon Says Stamp stitched rectangles.
I added a light watercolour wash with Sakura Koi Watercolours and finished the card with May arts jute ribbon.


Thanks for stopping by...Have a geat day!


Make it girlie

Hey!
The sketch is from Retrosketches #211...unfortunately, 
though the card was made I didn't put it up in time!


As I mentioned in my earlier post today, I stumbled upon a wonderful craft shop in Crawford Market, Mumbai, which is selling the most awesome paper packs!
I used the 'Summer Bloom' 6"x6" paper pack for this card. I overlayed the paper with Vellum and heat embossed part of the sentiment onto it. The sentiment is completed with a die cut from Simon Says Stamp. I finished the card with a Jute ribbon fromMayarts!

Butterfly Beauty


Hey there!


I stumbled upon this small craft shop in Crawford Market, Mumbai, which had amazing paper packs! I used a pretty paper pack called Summer Bloom for this card.
I punched out a few butterflies, adhered them and then dry embossed the rest of the card, before adding the sentiment from Hero Arts. I finished off the card with a piece of jute ribbon from Mayarts.

Thanks so much for stopping by...Have a good night!


Sunday, March 27, 2016

Blue giraffe

Hi! 
I just love the variety of the patterns in this paper pack and I have tried to showcase that here.
I used a wooden giraffe button as the focal point, placed on a few circles punched with my EK success and Punch Bunch punches.
I finished off the card with some jute ribbon.
I didn't add a sentiment as I felt it didn't need one. :-)

A cute and simple card.


Thanks for stopping by! Have a great day!

Friday, March 11, 2016

Reviewing the "All for Love "Paper pack from Craftangles by CraftAdda

Hello!
This paper pack that I am reviewing for CraftAdda today is just delicious!!!
the Craftangles "All for Love Paper Pack" has so many varied papers...as you can see, I haven't used the love themed ones. The papers are sturdy and have a beautiful smooth matt finish..a dream to work with!
I used a sketch from Retrosketches to help me start and used jute twine  from MayArts and butterfly buttons to embellish the card.
I decided not to add a sentiment, as it is always nice to have some blank cards on hand.
I hope you enjoy playing with these papers too...You can shop for them and other awesome art and craft supplies here...


Thanks so much for stopping by!
Have a great day!


Monday, February 29, 2016

Winnie and Walter Belated 2nd birthday bash challenges 8

Hello All!
I am playing all the Winnie and Walter 2nd Birthday bash challenges today!


With this card I am playing the
and the

To make this card, 
I created a watercolour panel using Sakura Koi water colours and watercolour paper.
When it was dry, 
I heat embossed the tree trunk rings 
(from Winnie and Walter's Winter Wonderland stamp set) in gold. 
It looks oh so pretty!
I then die cut the panel using Simon Says Stamp Stitched Rectangles 
I then stacked up a three of the diecut Happy sentiments to create dimension and heat embossed the rest of the sentiment in gold. (2 words).
I layered the panel with a few sheets of coloured vellum (also die cut with Simon Says Stamp Stitched Rectangles)
I adhered all these layers to a white card base and finished the card 
using some jute cord from May Arts.


This card is another favourite!!
Thanks so much for stopping by and reading through all my posts!!
Have a great day!