Showing posts with label sakura koi watercolurs. Show all posts

Monday, May 21, 2018

One stamp three ways!

Hello!
I have a a quick post for you today, showing off the new Craftangles background stamp 
I have stamped and heat embossed it on different card stock panels and,
 made three very different cards.

For card no 1...
1. I stamped and heat embossed the image with white embossing powder on black card stock. I then used Simon Says stamp stitched rectangle dies to cut it out.
2. I coloured the image using Steadler colour pencils.
3. I stamped the sentiment (from the Craftangles stamp set 'Beautiful bloom border'.
4. I die cut and coloured a butterfly and added it to the card along with some gemstones,
for some interest.
5. I matted the card panel with blue card stock (also cut using the SSS dies),
and adhered it to a black card base.


For card no 2.

1.I started out by stamping and heat embossing the beautiful image in white 
on white watercolour cardstock.
2.I then watercoloured the image using Sakura Koi water colours.
3.Once it dried, I die cut the panel using SSS stitched circle dies.
4.I added another circle below for interest.
5.I then added some paint splatter to the card base.
6.I adhered the watercoloured panel to the card base.
7. I die cut the word birthday (Craftangles 'Birthday wishes' stamp and die set) using gold card stock.
8. I added the rest of the sentiment (Craftangles 'Everyday Sentiments') and finished the card with some gold sequins.


For card no 3.
1. I stamped and heat embossed the image on red cardstock with gold embossing powder.
2.I cut out this square panel using SSS stitched square dies.
3. I used black cardstock to matt this panel.
4.I adhered it to the white square card base using fun foam.
5.I die cut the word 'Happy' (from Winnie and Walter) and adhered it to the card along with the stamped birthday sentiment.
I finished the card with some black jute twine and a gold bell.


I hope you liked these three cards and will give this stamp a try.
If you do, do not forget to tag us with #craftangles on social media.
We at HNDMD would love to see your creations.

Thanks so much for stopping by!
Have a great day!

Thursday, October 5, 2017

Wedding themed stamps from Craftangles

Hello!
I am absolutely thrilled to be playing with the newly released 
Wedding and Diwali themed stamps from Craftangles!

The first card is made using stamps from 
 I used Tim Holtz 'dried marigold' distress ink and the ink smooshing technique to create the beautiful background. I then stamped the mandalas from the 'Diwali wishes' stamp set using 
Tim Holtz 'Spiced Marmalade' distress oxide to create a tone on tone look.
I stamped the focal image using Tim Holtz 'Vintage Photo' distress ink on smooth white cardstock and watercoloured the same using Sakura Koi watercolour cakes.
I then popped up the focal image using fun foam.
I finished the card by adding the gold embossed sentiment and some gold sequins.


For the second card, I started by creating the background by smooshing some Tim Holtz 'Black Soot' distress ink onto red cardstock. I did a couple of layers of ink smooshing and then stamped the mandala ( Craftangles 'Diwali wishes') using Versafine Onyx black ink.
I just love the depth this has created.
I then watercoloured the focal image  from the Craftangles 'Mr. and Mrs. 'stamp set using Sakura Koi watercolour cakes. I fussy cut the image and popped it up with some fun foam.
I finished the card by adding a white embossed sentiment on vellum.


For this card, I started with a background made using the 'Rays' stencil from Craftangles. In the centre, I stamped the OM (Mudra stamps) using Tim Holtz 'Fired Brick' distress ink.
I stamped, watercoloured (Sakura Koi watercolour cakes), fussy cut and popped up the Ganesh (Craftangles 'Ganpati Bappa' stamp set) with fun foam to add dimension.
I finished the card with a sentiment from Mudra Stamps and  'bumblebee yellow' sequins from Craftangles.


My final card, I am thrilled to say, turned out exactly as I planned it.
I created a shaker element by diecutting two circles and creating a ring using double sided foam tape. I filled this ring with large round gold sequins (to represent coins!)
I dry embossed the panel using a cuttlebug embossing folder.
I finished the card by adding the watercoloured (Sakura Koi watercolour cakes) image of Goddess Lakshmi from the Craftangles 'Shubh Laabh' stamp set.


I hope you liked the cards as much as I really enjoyed making them!
Thanks for stopping by!
Have a great day!
Paru Mahtani
Paru's Perceptions!


Sunday, September 3, 2017

Sliding crabs

Hello! I am super thrilled to share these slider cards with you today!!
I played with the Craftangles "Oh Crab!!" ,"By the sea"  and "Mermaid Kisses" stampsets and 
Tim Holtz distress oxides!

I started by colouring the base panel with Tim Holtz 'Broken China' Distress Oxide as well as the 'Evergreen Bough' Distress Ink. 
I then sprinkled some water on it to create the spots. 
I then coloured another panel using Tim Holtz 'Fossilised Amber' Distress Oxide.
I was unhappy with the very smooth look of the paper and sprinkling water did not help..so I put down some ink on my craft mat, spritzed a little water on it and then dabbed the paper on it. 
This created a beautiful splotchy background and gave the illusion of texture.

While the backgrounds were drying, I water coloured the various images with my 
Sakura Koi watercolours.
Using Mama Elephant dies  and mftdienmics I cut the panel and the slider channel.

To create the slider, I used a round wooden bead sandwiched between two 1/2" punched circles.
You can learn how to make one of your own here.

I added a bit of vellum to create some interest on the first card.

I finished the cards, by adding the sequins and stamping the sentiment.


I hope you enjoyed the cards as much as I enjoyed making them! 
Check out how they move on  
my Facebook and Instagram feeds.

Thanks so much for stopping by!
Have a great day!
Paru Mahtani

Wednesday, February 15, 2017

Spotlight card

Hello!
I have a simple and fun technique called 'Spotlighting' here today,
which can enhance your greeting cards!
It's a simple technique where the image is re-stamped onto a small piece of cardstock and placed above the original image to create the illusion of magnifying the spot or creating a 'spotlight'.
It is such a pretty stamp set, and I decided to add the little bee for interest.


To 'spotlight' the flower and the bee, I first stamped the floral image onto Bielo cardstock 
using the Misti tool.
I then placed a punched circle of the same cardstock over the area that I wanted to 'spotlight' and stamped the image again. 
I now had a perfect image on the circle. 
I then coloured the images using Sakura Koi watercolours.
I then added the bee from the 'Bold Geraniums' stamp set from Stampendous.
I then adhered the circle using double sided foam tape. 
This created the illusion of magnification.


I then mounted the square cut panel onto a kraft panel (which I cut using Simon Says Stamp Stitched squares dies) and then finally onto the card using craft foam to add dimension.
I added a bit of green paint splatter and some gold sequins for interest.

I decided not to add a sentiment...the card was so pretty by itself!

Thanks so much for stopping by!
Have a great day!


Sunday, October 2, 2016

Craft Adda New release

Hello!
Have you seen the fabulous new Diwali release 
 from CraftAdda?!
These stamps are superb quality and when stamped the images are super crisp!


I have used some of these gorgeous stamps to create a set of  3"x4"notecards...perfect for the festive season!

I used a range of techniques to make these notecards... masking, rubber stamping, watercolouring, emboss resist and heat embossing. 

For this card, I first gold embossed the rangoli pattern from the 'Festival of lights' stamp set. I then masked off half the card using post it tape and used Tim Holtz distress inks  Fired Brick and Dried Marigold to blend the colours. I used a paisley stamp on the coloured background to create some interest. I finished the card with gold embossed sentiment from the same stamp set.


Saturday, September 10, 2016

How I photograph my cards

Hello!
I am back with another post for Indian Craft Room...this time about Photographing Greeting Cards.
Apologies for not posting yesterday, as promised!
I'm Paru Mahtani, an avid cardmaker and photogrpahy enthusiast. My passion for  card making led to a need to photograph my work; hence developed an interest in photography. Once I started exploring this hobby, it became addictive!
There are so many good blog posts, video and discussions on the internet about photographing you cards/crafts/art work. Thanks to the popularity of online shopping, crafters have realised the tremendous importance of photography!
The lessons I have learnt in my 15 plus  years of making cards are...

1. Research!! Research!! Research!!
Read blogs, look at others photos, read what they say about their photography processes, look at photos on Pinterest and Instagram and learn! 
Here are some resources:


2. Take a few photography classes to earn how to master your camera. 
Then you can create some amazing photos.

3. If you have a spot with great natural light, that's fantastic! If like most people, you don't, make an inexpensive lightbox (learn how to make one here.) and learn how to use it! 
The results are amazing!!
Here is an image of my set up...it's not perfect (the light box is a little wonky) 
but the results I get are just fab.

I have set it up at a height so that I don't have to bend. I have a put a little side table on top of my dining table and then placed the light box on top of it.
The lights are 'Sonia Trilights'. They have an adjustable stand and it is continuous  white light.
These are photography studio lights, but the same can be acheived with any continuous light.
I use a Canon 7D dslr, but very often take photos with my iphone if I dont have time to set up the light box.
I usually make a bunch of cards and  photograph them all together.


Here is the result!


These are photos taken on my desk with an iphone...


I hope this post has been useful and you have been inspired!! Do leave me a comment...I'd love to hear from you!
Thanks so much for stopping by today!
I will be back next Thursday with another post.
Have a great evening!

Monday, February 29, 2016

Winnie and Walter Belated 2nd birthday bash challenges 8

Hello All!
I am playing all the Winnie and Walter 2nd Birthday bash challenges today!


With this card I am playing the
and the

To make this card, 
I created a watercolour panel using Sakura Koi water colours and watercolour paper.
When it was dry, 
I heat embossed the tree trunk rings 
(from Winnie and Walter's Winter Wonderland stamp set) in gold. 
It looks oh so pretty!
I then die cut the panel using Simon Says Stamp Stitched Rectangles 
I then stacked up a three of the diecut Happy sentiments to create dimension and heat embossed the rest of the sentiment in gold. (2 words).
I layered the panel with a few sheets of coloured vellum (also die cut with Simon Says Stamp Stitched Rectangles)
I adhered all these layers to a white card base and finished the card 
using some jute cord from May Arts.


This card is another favourite!!
Thanks so much for stopping by and reading through all my posts!!
Have a great day!

Monday, February 15, 2016

Spritz and splatter at SSS Monday Challenge

Hello!
Today, I have made a money card or a cash gift envelope for the Simon Says Stamp Monday (Spritz and Splatter) challenge 

I have used two  of my favourite wood block stamps...The bottles from Inkadinkado and the sentiment from Hampton Art.
I stamped the sentiment and the image with Versafine Onyx Black ink and the used Sakura Koi watercolours to paint the flowers red.
I then splattered some of the red paint to add some interest. 
The envelope can be used for cash gifts and has a matching flat card insert for a personal message.


Thanks so much for stopping by! 
Have a great day!


Friday, January 15, 2016

Indian Craft room Blog Hop...Patriotic colours with texture.

Hey Everyone! 


Welcome to Indian Craft Room's Blog Hop! We are so happy that you have come along to play!

You would have arrived here from Sathya's blog.

The Blog Hop theme is "Indian Flag Colors with a Twist... use  Textures".


By Textures we mean Texture paste, Embossing paste, Embossing powders, Dry/Wet embossing, Material textures by burlap, Cheesecloth, Drywall tape. 

Any visible/ prominent textures.


This blog hop is open for cards / Altered items/ 3D projects/ Tags (Standard size, not less than 6"x3")


Here is my take on the challenge this month.


I started by heat embossing the sentiment from 'fiskars' on a 5.45"x3.45" piece  of  textured white cardstock, using Hero Arts White embossing powder. 

I then sprayed the paper with water and dropped Sakra koi watercolours onto the wet paper and allowed them to spread. 
I then sprayed some water on the card base and added some colour there too. 
Once both the card base and cardstock panel dried, I assembled the card and added some sequins to finish.
The textures I used...textured card stock and heat embossing.


This blog Hop is open to members of ICR only. Not a member... You can become a member here.


To play...


1. Start at the ICR Forum Blog Post.


2. Hop  to along through all the DT blogger posts, leaving your comments along the way.


3. Finish up by returning to the ICR forum Blog Post and leaving a comment saying that you have finished the Blog Hop.


4. If you would like to make a project based on the inspiration provided by out DT, link up your entry here. ( Only 1 submission per person).


5. Spread the word about the Blog Hop on Social Media. 


6. FOLLOW us on Facebook and Instagram.

7. Tag your entry with ICRBH01


The LINK PARTY will be open from 15th Jan  and will end at midnight on 28th January IST.


ICR is giving away some awesome prizes... to qualify, please follow all the rules mentioned above.


Here is the list of our DT Bloggers for you to hop along... You will be hopping along to the talented Pratyusha's blog! Don't forget to leave some love as you hop along!


ICR FORUM BLOG POST {START HERE}


Paru...you are here!  


Thanks so much for stopping by!

Have a great evening!

Wednesday, January 6, 2016

Watercolour Party!

Hey there!
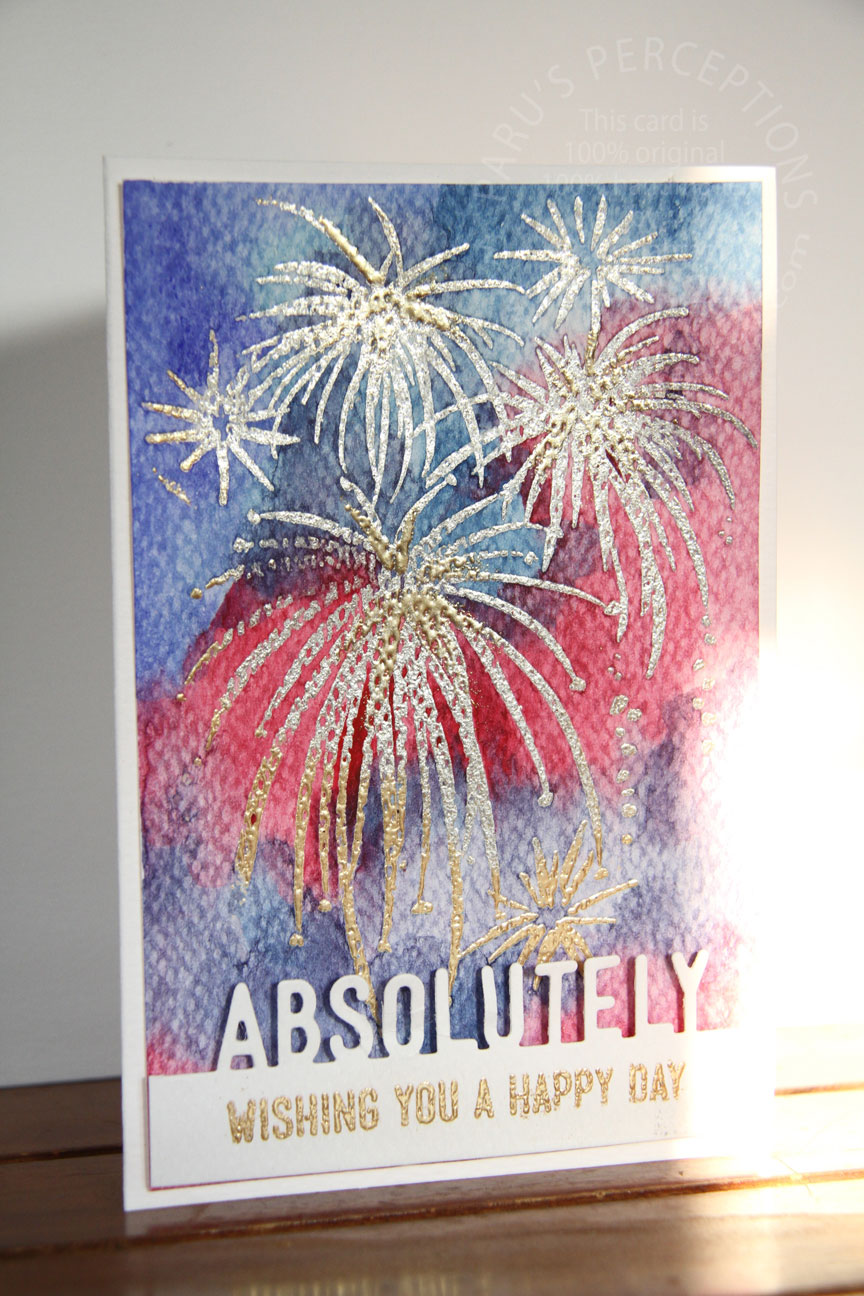
I am playing the Simon Says stamp Wednesday' Party 'challenge as well as the 
 I heat embossed the fireworks (from Stampendous)  with silver and gold for a celebratory feel!
I then watercoloured the background using my Sakura Koi watercolours. 
The sentiment is the Simon Says Stamp Absolutely edge die and stamp set.


Thank so much for stopping by!
Have a great day!