Showing posts with label winnieandwalter. Show all posts

Thursday, March 15, 2018

Fun with Craftangles patterned papers!

Hello!
I had a blast this week, playing with Craftangles patterned paper!
I have made two cards from each pack of patterned paper to show off their versatility.

I started with  the "Floral Exotica"  (Black Edition) paper pack.
This paper pack is SO luxurious!! I really enjoyed working with it.
The cards I made are really simple...
For the first card, I chose Earl Grey Craftangles cardstock to match the patterned paper and used it to "mat" the patterned paper.
I then heat embossed a birthday sentiment  (from Craftangles 'Congratulations' and 'Everyday Sentiments' stamp sets) on vellum and wrapped it around this panel. 
I finished the card with matching pink enamel dots.


For the second card, I used Craftangles 'Aqua' cardstock to mat the black patterned paper. I also stamped the Aqua card stock with  a Hero arts background stamp in a tone on tone colour (Tim Holtz 'Peacock Feathers' distress ink) for some interest. 
I finished the card with some aqua enamel dots.

I wish I could photograph the papers in a way to show you how gorgeous they are to the touch...you will just have to get some for yourself to try them out!! 


For the next two cards, I have used the Craftangles "All for Love"  paper pack.

For the next card, I layered three sheets of Patterned paper.
I stamped the flowers from the Craftangles 'Mom you rock' stamp set on the paper with the smallest pattern, along with a birthday sentiment from Stampendous. 
I then cut the sheet at an angle to create some interest. 
I then placed this sheet over the black ruled sheet to make it pop. 
I then adhered the entire panel on the pink patterned paper and then adhered the entire panel on a white card base.
I finished the card by adding some matte enamel dots in two shades of pink.


The thing with making cards with patterned paper is that you end up with a lot of scraps!
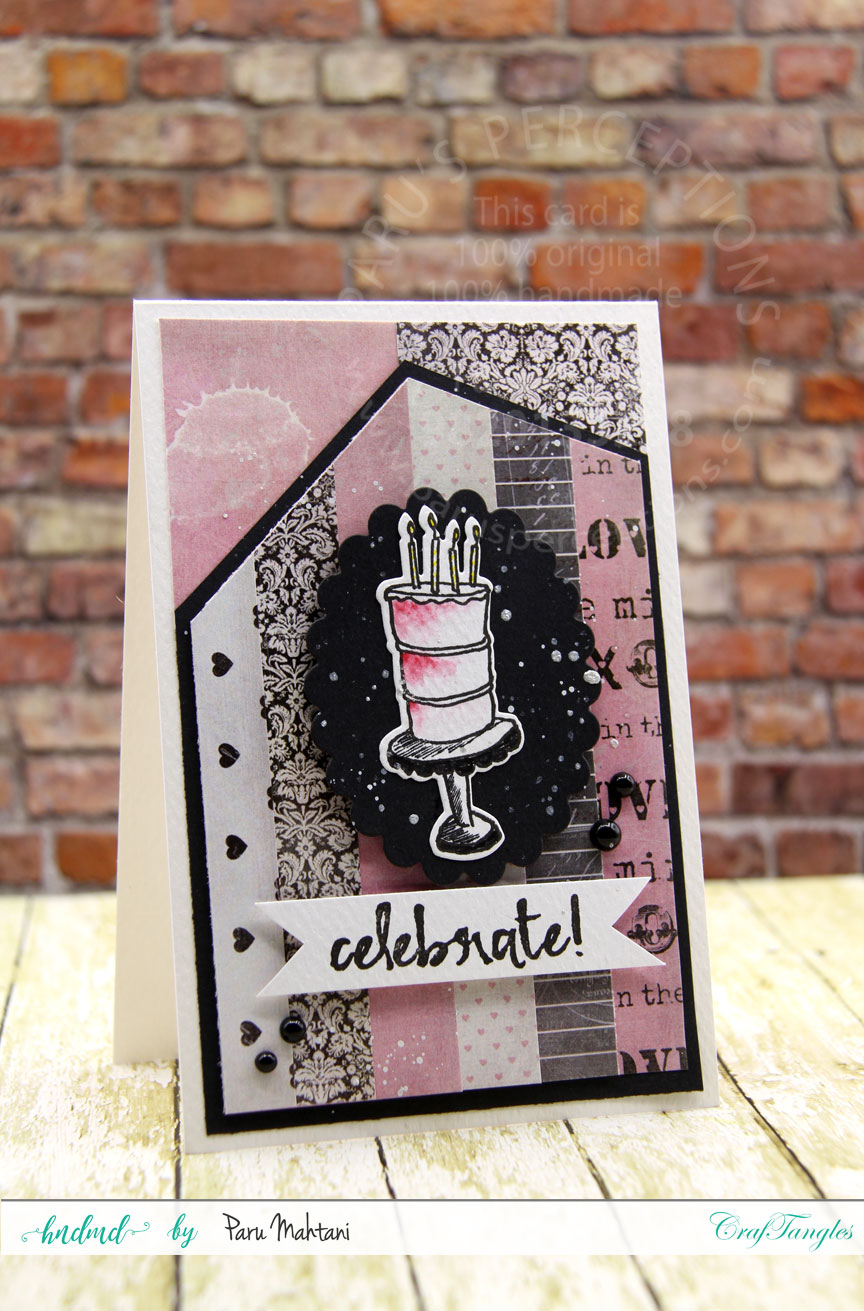
For the next card, I used up a few scraps. 
I cut the scraps into strips (from the Craftangles "All for Love" stamp set) and layered them to create a panel. 
I then cut this panel at an angle to create some interest.
 I then matted this panel on a piece of black cardstock to make it pop.
Once this piece was cut to size, I added a couple of scraps of patterned paper as a final layer and adhered them all to the white card base.
I then stamped and die cut the cake (lightly watercoloured) from the Concord and 9th 'Eat Cake and Celebrate' stamp set, as well as the sentiment.
I felt, the image needed something to make it stand out so I die cut a piece of black cardstock with a scalloped oval die to place below the image.
Finally, I added some silver acrylic paint splatter and some black enamel dots to finish.

As you can see, I have used one paper pack to create two completely different of cards.

For the last two cards, I have used the Craftangles "Be My Valentine" paper pack.

For the first card, I die cut the word 'Happy' using the Winnie and Walter  word die
 out of the chevron patterned paper. 
I then cut it at an angle and layered it on the pink patterned paper. 
Then I inlaid the die cut bits into the word to make it readable.
I stamped and added the birthday sentiment and some lime green enamel dots to finish the card.


For the last card, I used the die cut from the card above and
 layered it with a piece of die cut fun foam to add dimension.
I created a background panel from Craftangles 'Earl grey' card stock,
 by stamping it with a Hero Arts background stamp and Memento 'London Fog' ink.
This created a tone on tone look.
I then layered this panel with a piece of red cardstock and adhered it to a white card base.
I finished the card with a birthday die cut (from Craftangles) and some white acrylic paint splatter.


I hope you enjoyed this blog post and will give these papers a try!
They are super fun!

Thanks for stopping by!
Have a great day!

Paru Mahtani

Saturday, October 28, 2017

Making Christmas cards using Craftangles Stencils.

Hello! 
Today I have a few Christmas cards which I have made using Craftangles stencils.
It was a lot of fun using them in different ways!!


For the first card, I created a background blending together Tim Holtz distress inks and Distress oxide inks on Craftangles grey cardstock.
I then used the Craftangles 'dots' stencil and Hero Arts Unicorn white ink to create interest.
I then added a birch trees die cut, Impression Obsession birds die cut and a torn piece of white paper to create the snow bank.
I finished the cards with Craftangles clear sequins.
I stamped the sentiment using a misti tool and two colours of Tim Holtz distress inks, one on top of the other.


For the second card, I stated by using the Craftangles stripes stencil, first in one direction and then in the opposite direction to create a checked pattern.
I do not have a poinsettia stamp, so I created the poinsettia flower using a single leaf from an old Stampendous stamp set. 
I stamped four leaves, masked them and then stamped them again to create the poinsettia.
I then embossed this flower with gold embossing powder, water coloured it, fussy cut it and popped it up on the background using 3D foam tape.
I added a wooden button in the centre for interest.
I heat embossed a sentiment from Hero arts and a swirl from a Hot of the Press stamp set.


For the third card, I stamped a plaid background onto red cardstock with black ink.
I then created a panel using Craftangles 'leaves' stencil  and Tim holtz distress ink.
and watercoloured some berries among the stencilled leaves.
I then matted this panel on green cardstock and then onto the black plaid bakckground. 
I added a stamped and heat embossed the sentiment on vellum 
along with some Craftangles sequins to finish the card.


For the fourth card, I created a simple red and white background using the Craftangles 'Stripes' stencil and Tim Holtz 'festive berries' distress ink.
I overlaid this background with a  vellum panel with a simple heat embossed christmas tree and sentiment from Hero Arts. I finished the card with some  red self adhesive gemstones to add some sparkle!


For the fifth card, I used the Craftangles 'Stripes' stencil again, 
this time with Tim Holtz 'Black Soot' ink. To create interest, I added some red lines using my red signo gel pen, in between the black stripes. 
I overlaid this panel with a vellum panel attached using black rivets.
I then stamped and die cut the images (Stampendous) and added them to the card using 3D foam tape. I stamped and heat embossed the sentiment onto the vellum and popped up the entire panel using 3D foam tape onto a red cardstock panel and then onto a white card base.


I had a blast making these simple cards..
I hope I have inspired you to give Craftangles stencils a try!!!

Thanks so much for stopping by!
Have a great day!


Thursday, February 23, 2017

Shaker with Bells

Hello!
Today I have a couple of simple shaker cards for you, 


To make this card, I created a simple white shaker window using Queen and Company frame dies. 
I then placed some gold ghungroos (bells) inside,
 and placed it on a background of the dancing girls paper.
A simple gold embossed sentiment from Simon Says Stamp finished this card.


To make the second card, I used two different papers from the same paper pack.
I created the shaker window using Queen and Company oval frame dies, placed the sequins and sealed the window using the India patterned paper. I then placed this sealed shaker on the dancing girl background.
I love how the yellow paper pops and our national colours shine!

I love this paper pad so much, I have bought a second one!


I hope you will try out this paperpack.
You can buy it here.

Thanks for stopping by!
Have a great day!
Paru Mahtani

Friday, December 2, 2016

Christmas shaker tags with the fuse tool!

Hello!!
Today I have some shaker tags  which I have made using the We R Memory Keepers Fuse tool.


It is such a fun tool...once you figure out how to use it!!
Here is a really good video showing you how to use it.


I found its good to let it get really hot before using it. 
It works best of soft plastic folders..like the one shown below.
I haven't had any success on acetate.


It comes with a steel ruler which can be used a s a guide to seal the plastic. 
I tried to make  circular tags...but found them very difficult.


So, after many attempts, I decided to make simple rectangular tags.
These were really easy to make. 
I started by placing the embellished tag inside the plastic sleeve and sealing it on three sides. 
I left one side open to fill with the shaker elements...lots of gorgeous sequins from A1 Craft supply!
I then sealed the fourth side, punched a hole and added a rivet and twine to finish the tag.
I also added some embellishments and sentiments on the top of the tags for interest.


I used the We are Memory Keepers 123-punch board to make a little box to hold the tags I made. 
I followed Jennifer McGuires video to make this box.


I hope you are inspired to try out the Fuse Tool and the 123 envelope punch board from 
We are Memory Keepers!
If you have any questions, (or even if you don't) do leave a comment below. 
I'd love to hear from you.
Thanks so much for stopping by..
Have  a great day!