Showing posts with label hero arts. Show all posts

Thursday, November 15, 2018

It's time to make Christmas cards!

Hello!!
I have made some fun Christmas cards for you today, 
using Craftangles stencils, glimmer pastes and art sprays!

For the first card, I used the Craftangles 'Floral Mesh' stencil with Tim Holtz distress inks to create a backgroud. 
I die cut this panel using Simon Says Stamp stitched rectangle dies. 
I then added a stamped and fussy cut holly image and a sentiment (from Hero Arts).
I then layered it with another die cut panel (in red) on a black card base from Craftangles.
I finished the card with some clear sequins from Craftangles.


For the second card, I used the Craftangles snowflakes stencil 
and the Craftangles Fairy Dust glimmer paste to create a background. 
I then added a die cut panel in white in the foreground and a die cut lamp, wreath and bow.
I added a sentiment from Hero arts and finished the card by adhering it to a red card base from Craftangles.


For the next card, I started by smooshing some Tim Holtz mowed lawn distress ink onto a smooth white card base. 
Once dry, I used the Craftangles Christmas tree stencil along with the Craftangles 'Fairy dust' glimmer paste to create the background.
I then adhered a die cut white panel for the foreground and a die cut and distressed (with Tim Holtz tea die distress oxide) deer. 
I then stamped the sentiment from Hero Arts and adhered this panel to a kraft card base to finish the card.
Oh, and I also added a die cut bow to the deer for a splash of colour.


For my last card, I created a background using the Craftangles 'Dots' stencil and Craftangles 
Art sprays. Once dry, I used the Craftangles 'Rays' stencil and Craftangles gold glimmer paste to create a unique background.
I then added a die cut white deer layered with a die cut piece of fun foam in order to give it dimension.
I added a sentiment (hero arts) and a little red resin heart for colour and interest.
I adhered the panel to a white textured square card base to finish the card.


I hope you enjoyed these cards as much as I enjoyed making them!
All the products used have been linked to the HNMD site so do have a look.

Thanks so much for stopping by! 
Have a great day!

Paru Mahtani 
Paru's Perceptions.


Thursday, May 3, 2018

One stamp set, ,many cards!

Hello!
I have some fun Mother's Day cards today using sentiments from the newly released 
 I started with the Mother definition stamp  and paired it 
with a die cut images from mft dienamics tea party die set.
I also added a strip of plaid patterned paper which I die cut using 
Craftangles 'scallopped edge die, for interest.
To me, the cup of tea represents the comfort of a mother's kitchen!
What do you think?


For the second card, I started with a grey card base on which I created a background  using a tiny flower  and twig stamp from the Hero Arts 'Everyday sentiments' stamp set, and , Versafine Smokey Gray ink to create a tone on tone look.
I took the sentiment from Craftangles 'Happy Mother's Day' stamp set and cut it apart so that I could separate the word mother from the rest of the sentiment.
Then, using my Misti, I stamped the sentiment (without the word 'mother') in Memento 'London Fog' ink. I then added the word 'mother' in place (and removed the rest of the sentiment) and stamped it using Memento 'Rose Bud' ink.
I then used the same to inks to stamp the little flowers and twigs to decorate the panel.
I added the word Mom, using a a die cut from Simon Says Stamp. 
I also cut the sentiment panel using Simon Says Stamp stitched rectangle die.
I finished the card using Craftangles cupcake pink sequins.


For the third card, I cut apart another one of the definition stamps from the 
Craftangles 'Happy Mother's Day' stamp set and stamped the sentiments individually 
on the arms of this fabulous swiss army knife die cut (Art Impressions).
I often do this to make the stamps more versatile. 
This is a 'His' version of this die...there is a hers version too..which I don't have, so I decided to make this a little girly..hence the pink!!

The stamps can easily be put back together to their original form..as you will see in the next card.
I used the Craftangles 'polka dots' stencil to create the background and added a white embossed sentiment  (from Art Impressions) to finish the card.


For the fourth card, I used the same definition stamp as above...
 from Craftangles 'Happy Mother's Day' stamp set.
I had cut it apart to use it above, I put it back together to stamp it on the card below.

I then stamped a border around the edge of the card panel using stamps from 
Stampendous' 'Hand of friendship' stamp set.
I water coloured the flowers and leaves and added some shiny brown sequins and the sentiment to finish the card!


For the last card, I stamped and die cut a small background panel using Simon Says Stamp
stitched square dies.
I stamped the sentiment (from the 'Happy Mother's Day' stamp set from Craftangles) at the bottom of the panel to create interest,
I stamped and coloured the books (from Three Room Studio's one more chapter stamp set), 
and added them like bookends to the sentiment, using 3D foam tape.
I then matted this panel using some black cardstock and adhered it to the card base using fun foam.

I added the Mother's  Day sentiment (from Craftangles 'Mom you rock' stamp set) to finish this simple CAS card.


I love that I have been able to create so many different types of cards 
with this super versatile stamp set 'Happy Mother's Day' from Craftangles.

I hope you enjoyed the cards. 
If you have any questions about my process, please leave me a comment.
I'd love to hear what you think too!

Thanks so much for stopping by...Have a great day!

Paru Mahtani


Sunday, December 25, 2016

Merry Christmas!

Merry Christmas!!
This is the most favourite card that I made this year!!
I was inspired by this card  by Paper Luxe that I saw on Pinterest.

It is the first time I have tried something like this...I created an ink blended sky using Tim Holtz distress inks. Before blending, I used my Versamark pen and Ranger white embossing powder  to heat emboss some snowflakes.
To create the snow banks, I used the Mama Elephant dies, which I distressed as well. 
 I then die cut two bicycles from Memory Box..one in black and one in white and adhered them a little off set..to create the look of snow.
I added a couple of punched holly leaves and a red ribbon to the handle to finish the image.
I completed the card with a holiday sentiment from Hero Arts.


I hope you liked the card...I would love to hear from you if you did!!
Thanks so much for stopping by..
Have a great christmas day!!

Thursday, December 22, 2016

Quick and Easy Christmas cards-part 4

Hello!
Here is my last and final quick and easy Christmas card using ScrapBerry's patterned paper
For this card, I used the cute snowmen patterned paper from the ScrapBerry's Happy Holidays 6"x6" paper pack along with two designs from the ScrapBerry's One Upon a Winter paper pack.
I used a sketch from Retrosketches archives as inspiration 
when I layered the patterned papers on a white card base, 
added adhesive pearls and a stamped sentiment with green Bakers Twine, 
to complete the card.
Sweet, simple and quick, don't you think?

Thanks so much for stopping by!
Have a great day!

Thursday, December 15, 2016

Indian Craft Room Blog Hop. Christmas Cards

Hello everyone!
Welcome to the ICR Blog Hop!
It has been a wonderful year at ICR and we are ending the year with a blog hop by all the 
team members who were creating for ICR this year!

For this blog hop, we are creating cards with 
any type of EMBOSSING.
It could be heat embossing (wet embossing) or,
 embossing with an embossing folder (dry embossing)


You would have come here from 
Gopi's blog..

I have a set of 5 christmas cards to share today.
I have used both wet and dry embossing techniques on all the cards. 
I hope you enjoy reading about them as much as I enjoyed making them!!


For the first card, I doodled four christmas trees, 
painted them using Sakura Koi watercolours and fussy cut them. 
I then cut the snow bank using Mama Elephants's landscape trio dies and,
 embossed the background with Cuttlebug embossing folders.  
I then placed the background panel on a 5"x5" red card stock base.
I finished the card with a sentiment from Hero Arts and a bit of jute twine from MayArts.


I have seen versions of this card  a lot on Instagram and Pinterest, and, 
I was inspired to try making my own.
I embossed the background panel with a Cuttlebug embossing folder and, 
blended Memento Summer Sky ink onto it.
I stacked three stitched circle die cuts one on top of the other and 
added googly eyes, a shiny gemstone for the nose and a doodles smile.
 I then added twigs, (die cut using Memory box dies)
 for the arms and a doodled and coloured scarf.
I then placed the panel on a red card stock base and
added a sentiment from Hero Arts to finish the card.
I love the feeling of breeze, when I see this card


I particularly love this card! 
I learnt how to colour the Holiday Bow from the Ton stamps, 
The rest of the card is simple..
A Cuttlebug embossed background panel and,
 a gold heat embossed sentiment on vellum finish the card.


I doodled another three Christmas trees, coloured and cut them for this card. Again, I used the Mama Elephant landscape trio dies to create the snowbank and Cuttlebug embossed the background.
I finished the card with sentiments from Hero Arts and jute twine from May Arts.


For this card, I Cuttlebug embossed swirls on the background panel, to begin with.
I then stamped and heat embossed and fussy cut two cups from 
the Paper Smooches 'Cyber Cafe' stamp set. I placed the cups on a vellum panel on which I had heat embossed the heat swirls in white embossing powder. I then hand stitched the panel onto the card base. I added a gold heat embossed sentiment and some green Bakers Twine to finish the card.


I hope you enjoyed reading about these cards, and I hope you are inspired to create some of you own this season! 
Do leave a comment..I'd love to hear from you!

Next on the hop is the lovely Pratyusha..head on over and leave her some love!

We have some awesome prizes in store for you...

a bag of goodies  (dies, stamps, etc.)
from


Don't forget to link up your creations here and leave a comment on all the blogs!

                            Paru<---- You are here
                       Pratyusha<----Next blog


Thanks so much for playing along...
Have a great evening!!

Saturday, December 3, 2016

Quick and Easy Christmas cards at CraftAdda

Hello!
welcome back to part 2 of Quick and Easy Christmas cards using patterned paper from 
I can't get enough of this paper pack..it has such fun designs and the quality is just fantastic!


To make this card, I used the Christmas tree paptterned paper as the base and,
 overlayed it with the cute houses paper. 
I felt it needed something to make it pop, 
so I added the two strips of red card  stock on either side. 
I stamped two panels with greetings from the Hero Arts 'Xmas sentiments' stamp set and,
 adhered them to the top and bottom of the card.
 I finished the card by adding some self adhesive pearls.

So much fun to make and really quick and easy. 
Hope you are merrily making some Christmas Cards with patterned paper!

Thanks so much for stopping by!
Have a great day!
Paru Mahtani
Paru's Perceptions.

Friday, December 2, 2016

Christmas shaker tags with the fuse tool!

Hello!!
Today I have some shaker tags  which I have made using the We R Memory Keepers Fuse tool.


It is such a fun tool...once you figure out how to use it!!
Here is a really good video showing you how to use it.


I found its good to let it get really hot before using it. 
It works best of soft plastic folders..like the one shown below.
I haven't had any success on acetate.


It comes with a steel ruler which can be used a s a guide to seal the plastic. 
I tried to make  circular tags...but found them very difficult.


So, after many attempts, I decided to make simple rectangular tags.
These were really easy to make. 
I started by placing the embellished tag inside the plastic sleeve and sealing it on three sides. 
I left one side open to fill with the shaker elements...lots of gorgeous sequins from A1 Craft supply!
I then sealed the fourth side, punched a hole and added a rivet and twine to finish the tag.
I also added some embellishments and sentiments on the top of the tags for interest.


I used the We are Memory Keepers 123-punch board to make a little box to hold the tags I made. 
I followed Jennifer McGuires video to make this box.


I hope you are inspired to try out the Fuse Tool and the 123 envelope punch board from 
We are Memory Keepers!
If you have any questions, (or even if you don't) do leave a comment below. 
I'd love to hear from you.
Thanks so much for stopping by..
Have  a great day!


Thursday, December 1, 2016

Craft Adda official December post no.1

Hello!!
Happy December!
You can feel the nip in the air in Mumbai and its starting to feel like Christmas!!
to make some quick and easy Christmas cards.
The papers that I have used for this card are from the Happy Holidays 6"x6" paper pack.


To make this card I started by trimming the green trees paper to size to fit the front of my card base. 
I then used the Simon Says Stamp 'stitched squares die to die cut the windows patterned paper.
I order to make it stand out a bit, I layered it with white card stock. I then added the white tree which I die cut using the memory box die.
I finished the card with a sentiment from the Hero Arts 'Xmas sentiments' stamp set, a little die cut memory box house as well as some clear sequins.
I just love the cheerful look of the card and though it doesn't snow in Mumbai, it makes me feel all christmassy!! ;-)

Thanks so much for stopping by!
Have a great day!

Saturday, September 10, 2016

How I photograph my cards

Hello!
I am back with another post for Indian Craft Room...this time about Photographing Greeting Cards.
Apologies for not posting yesterday, as promised!
I'm Paru Mahtani, an avid cardmaker and photogrpahy enthusiast. My passion for  card making led to a need to photograph my work; hence developed an interest in photography. Once I started exploring this hobby, it became addictive!
There are so many good blog posts, video and discussions on the internet about photographing you cards/crafts/art work. Thanks to the popularity of online shopping, crafters have realised the tremendous importance of photography!
The lessons I have learnt in my 15 plus  years of making cards are...

1. Research!! Research!! Research!!
Read blogs, look at others photos, read what they say about their photography processes, look at photos on Pinterest and Instagram and learn! 
Here are some resources:


2. Take a few photography classes to earn how to master your camera. 
Then you can create some amazing photos.

3. If you have a spot with great natural light, that's fantastic! If like most people, you don't, make an inexpensive lightbox (learn how to make one here.) and learn how to use it! 
The results are amazing!!
Here is an image of my set up...it's not perfect (the light box is a little wonky) 
but the results I get are just fab.

I have set it up at a height so that I don't have to bend. I have a put a little side table on top of my dining table and then placed the light box on top of it.
The lights are 'Sonia Trilights'. They have an adjustable stand and it is continuous  white light.
These are photography studio lights, but the same can be acheived with any continuous light.
I use a Canon 7D dslr, but very often take photos with my iphone if I dont have time to set up the light box.
I usually make a bunch of cards and  photograph them all together.


Here is the result!


These are photos taken on my desk with an iphone...


I hope this post has been useful and you have been inspired!! Do leave me a comment...I'd love to hear from you!
Thanks so much for stopping by today!
I will be back next Thursday with another post.
Have a great evening!

Monday, April 25, 2016

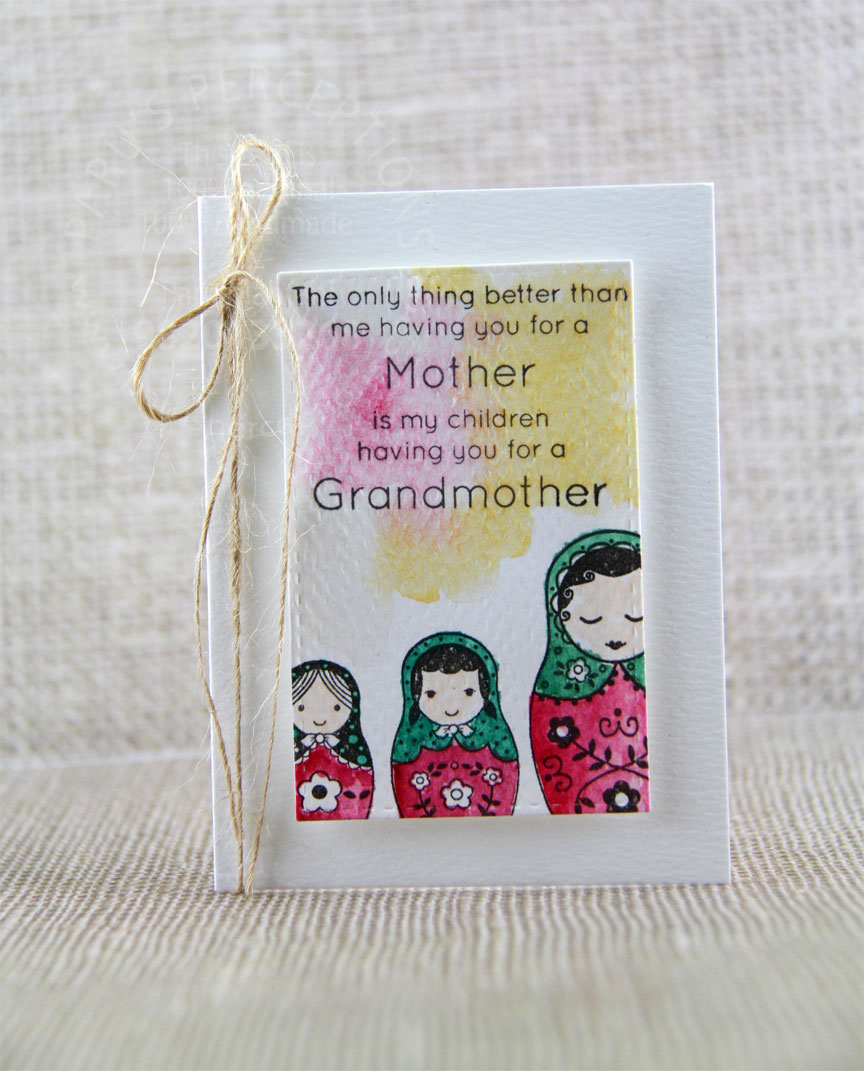
Gramdmother dolls

Finally found  a sentiment (from Simon Says Stamp) to match this gorgeous Doll stamp set from Hero Arts.
Its a quick and simple note card... The card topper is cut using Simon Says Stamp stitched rectangles.
I added a light watercolour wash with Sakura Koi Watercolours and finished the card with May arts jute ribbon.


Thanks for stopping by...Have a geat day!


Butterfly Beauty


Hey there!


I stumbled upon this small craft shop in Crawford Market, Mumbai, which had amazing paper packs! I used a pretty paper pack called Summer Bloom for this card.
I punched out a few butterflies, adhered them and then dry embossed the rest of the card, before adding the sentiment from Hero Arts. I finished off the card with a piece of jute ribbon from Mayarts.

Thanks so much for stopping by...Have a good night!


Monday, February 29, 2016

Winnie and Walter Belated 2nd birthday bash challenges 3

Hello!


Here I am playing the 

and the 

To make this cash gift envelope
I created a background using 'The Big Bold and Extras' stamp set from Winnie and Walter. 
I used Hero Arts Ombre inks fro the flowers and Memento inks for the leaves.
I die cut the Winnie and Walter Congrats sentiment in gold and black and layered it over a piece of vellum to make it pop!
I also stamped matching flowers on the insert.


Thanks so much for stopping by!
Have a great day!


Monday, February 15, 2016

Second round of inspiration for the mandala and tic tac toe challenge!

Hello!
We at The Indian Craft Room are back with more inpsiration for this months Tic-Tac-Toe Coasterride for you!


This month's hostess is Gopi and she wants to play TIC-TAC-TOE !
She has twist to the game though...you must make a card/project incorporating a Mandala design.

The challenge will run from the 1st to the 29th of Feb.


 As always, we have a few rules. Please read them carefully before you play.


1. Follow Indian Craft room

2. Blog about the challenge on your personal blog and link your post back to Indian Craft room.

3. If you do not have a blog, please post about the challenge on social media and link it back to Indian Craft room

4. If you have a blog, download and display this ICR challenge badge prominently on your blog.


5. Display the story board prominently in your blogpost and link it back to Indian Craft Room.

6. Upload your photos to the ICR gallery using the tag name ICRPREWIN03

6. Like ICR on Facebook and Instagram


If you have any questions, please feel free to leave  me a  comment below.


Our sponsors for this challenge are the awesome people at the Krafter's Cart
They have sponsored a Rs.500 gift certificate from their store.


We're  also announcing a special giveaway for participants who  will play our challenges every month from January to April 2016.


Here is my second round of inspiration for you...


To make this tag, I stamped the Hero Arts background stamp in black and heat embossed it with clear embossing powder ( A trick I learned from Jennifer Mcguire). I heat embossed a love sentiment(from Verna's Creations)in gold on black paper, and, tied the two together with gold and black ribbon.

I have used....ribbon-love sentiment-heat embossing


CoasteRide ends at midnight on February 29th 2016
Don't forget to tag your submissions in the ICR gallery with the tag name 
ICRCPREWIN03


Now that you have all the details come on over and play along!

Thanks for stopping by!
Have a great day!