Showing posts with label rubberstamping. Show all posts

Thursday, January 3, 2019

Craftangles 'Anything Goes' challenge.

Hello and welcome to the first Craftangles monthly Challenge. 
The theme for this month is 
Anything Goes.


CrafTangles Monthly Challenges are a creative way to not only get inspired by our fabulous design team members, but also an opportunity to don your crafty hats and inspire others.

We would be hosting a new Challenge on 1st of every month with inspirations from our design team.
It would run for the complete month and post that our Design Team members would Pick up three winners and 3 honorary mentions.

The 1st winner would get a Goodie Bag from CrafTangles worth Rs. 500 and the two runner-ups (2nd and 3rd winner) would receive a goodie bag worth Rs. 250. (Shipping is Free for Indian Address). International winners can choose to pay for International shipping or they would be provided with a Voucher / Coupon worth Rs. 500 / Rs.250 which can be redeemed against CrafTangles products at www.hndmd.in .Apart from the goodie bags, each winner would also receive a surprise coupon code that they can redeem at www.hndmd.in against CrafTangles products. 

In order to participate follow the below guidelines

  1. Like CrafTangles and HNDMD Facebook pages
  2. Follow us on Instagram  - CrafTangles and HNDMD
  3. We would be using Inlinkz to add your projects to the challenge.
  4. Projects can be made using any brand craft supplies. You would get extra brownie points if you submit a project made using at least one CrafTangles product. Products may vary according to each challenge's theme.
  5. Only projects/posts made after the challenge has gone live would be eligible for the challenge. Predated posts and projects would not be allowed.
  6. Link to actual project page only. Link to the main blog would not be considered. 
  7. In case you do not have a blog, share the project via your social media channels - Instagram or Facebook. Mention the products used in the description. Do not link to albums in Facebook, only to a specific image.
  8. All type of Craft, Art and Home decor projects are eligible for the challenge, based on the current month's theme.
  9. Maximum of 3 entries are allowed per participant per challenge.
  10. Winners would be provided with badges/blinkies to share on the blog and social media
Here is my inspiration for this brand new challenge.


I have played with the newly released Craftangles 'All year round- Calender stamp'.
Oh its  so much fun and has so many possiblities...I will share more in the days to come on social media so do keep a look out!
I will also share a tutorial soon.

To create this card, I checked the dates for the month of January on a calender and masked off the rest of the stamp, before applying ink to it.
I then removed the masks and stamped the dates. 
I then added the days of the week and the month. 
I wanted to highlight the 5th of the month so I stamped it on another piece of card stock with red ink and punched it out with a circle punch.
I then distressed the edges with Tim Holtz distress ink and adhered it the the calender using #D foam tape, in order to make it stand out.
I then stamped, coloured and added the aquarius image from Mama Elephant.
I layered the calender with red cardstock and and then adhered it to a beige card base.
I stamped a birthday sentiment and a die cut from Craftangles to finish the card
I also added some paint splatters to create some interest.


I hope this card has inspired you to play with this stamp and play along in our challenge.
Do read the rules carefully as given above.

Thanks so much for stopping by!
Have a great day!

Paru Mahtani

Monday, October 15, 2018

Warli cards

Hello!
Im showcasing the newly released Warli Borders stamp set from Craftangles today.
Its a simple stamp, so I made some simple but effective cards which show how they can be used in different ways for different occassions.

For the first card, I gold embossed the image along with a sentiment from 
I think the image and the sentiment go well together.


For the second card, I stamped the image of the wedding party Warli border in black on white card stock. I then used Tim Holtz distress inks to colour images.
I stamped the sentiment, from Craftangles 'Indian Wedding' stamp set in black Versafine ink.
I then trimmed the card stock to size and mounted it with foam tape to a brown card base made with Cinnamon Brown cardstock from Craftangles.


For the third card, I stamped the Warli village scene border on Craftangles Tangerine cardstock using Versafine Crimson ink.
I then die cut this panel using Simon Says Stamp stitched rectangle die and added a gold embossed sentiment from the newly released Craftangles 'From all of us' stamp set.
I then mounted this panel using fun foam, onto a SSS die cut panel of Craftangles 'Wine Red' cardstock.
I have to say here, that, Craftangles cardstock is by far THE MOST luxurious card stock that I have used. It just feels so smooth and any technique that you use on it is a huge success.
I then adhered this panel to a white card base to finish the card.


A simple stamp set, three simple cards.
I hope you will give this set a try.
I'd love to hear what you think...do leave your comments below.

Thanks so much for stopping by!
Have a great day!

Paru Mahtani
Paru's Perceptions.


Thursday, September 6, 2018

Diecutting and stencilling with glimmer paste

Hello!

I've been having so much fun with Craftangles glimmer pastes this month!!
I also decided to play with the Tiffany inspired colours..aqua, white, gold and black.
Here is what I came up with!

For my first card, I started out by stencilling a cardstock panel with Tim Holtz 'Cracked Pistachio' and Craftangles 'Gold Dust' glimmer paste and the Craftangles 'dots' stencil.
I then die cut the word 'Happy' using the Winnie and Walter die and created a simple shaker card, filling it with Craftangles 'clear shimmer' sequins.
I added a stamped and fussy cut Altenew  layered rose to add some colour. I finished the card with a white heat embossed birthday sentiment on black card.

Its hard to photograph the gold glimmer, but the card looks really pretty.


For the next two cards,
I started out by creating two patches of card using 
Craftangles 'Gold dust' glimmer paste and Tim Holtz 'Cracked Pistachio' distress ink.
I did this in order to use these panels to die cutting.


For the second card, I started by creating a card panel using 

I used the gold glimmer panel I made to die cut the Flora and Fauna 
Volkswagon beetle car. I also die cut the same using some craft foam,
which I used to give the card some dimension.
 I then encircled the car with the My Favourite Things Happy birthday die cut, cut from
Cratangles Aqua cardstock.

I finished the card with a white embossed sentiment on black cardstock.
Again, its hard to photograph the glimmer, but its Oh so pretty!


For the last card, I was inspired by this card I saw on Instagram.
I loved the look of layered balloons and decided to try it myself.
I used the aqua and gold glimmer card stock I created to die cut the balloons (From Lawn Fawn) . 
I further inked the aqua balloons to add some dimension. 
Once the panel was dry, I adhered the balloons and the sentiment (from Simon Says Stamp) and finished the card with some shiny black sequins.


I really love how these cards turned out..I hope you like them too.
Thanks so much for stopping by..
Have a great day!
Paru Mahtani
Paru's Perceptions.


Friday, July 27, 2018

Stencils and Texture paste.

Hello! 
I 'm so excited to use a brand new Craftangles product! 
The Craftangles Black Charcoal texture paste and Craftangles Glimmer paste.
Both these products are just amazing and so much fun to use to use! I hope you will give them a try!

I've put together a few process videos, so I apologise for the length of this post.

I created a panel using Craftangles 'skyblue' card stock, geometric flowers stencil and the black texture paste. The results are amazing..as you can see.
Immediately after using the paste, I washed off the stencil with water and dish soap. 
Once dry, the texture paste is hard to remove.


I die cut the stencilled panel with Simon Says Stamp stitched circle die and adhered it to the centre of a square white card. 
I stamped an fussy cut these beautiful gerberas (from Unity stamp co.) and adhered them to the card along with some glass beads to finish.
I haven't added a sentiment, so I can use this card for any occassion.


For the second card, I created a panel using the 'Overlapping circles' stencil from Craftangles and the Black Charcoal texture paste. I then die cut the panel using Simon Says Stamp stitched square dies, matted it with black cardstock and adhered it to a square white card,
using fun foam to add some dimension.
I stamped, watercoloured and fussy cut the meditating frog from Stampendous 'Frog Yoga' stamp set
and added it to the panel. 
I think it really pops against that black background.
I finished the card with a sentiment from Flora and Fauna.


Here is a close up of the texture paste.


For the third card, I decided to create a black on black panel.
The result was brilliant..
Here is a process video.


Once the panel had dried, I decided to add some pop!
I stamped and fussy cut images from my brand new Sunny Studios 'Berry bliss' stamp set.
Once I arranged them on the background, I added some white paint splatter to add some interest.
This is really one of my most favourite cards and I'm so happy to share it with you.


Here is a detail photo of the gorgeous black on black background!


For the 4th card, I started with a square piece black cardstock from Craftangles, the Craftangles fireworks stencil and Craftangles Glimmer pastes 'Lemon zest', 'Orange peel' and 'Amethyst'.
The fireworks these pastes created are just beautiful!!


After some thought, I stamped and fussy cut this fun image from Art Impressions and added it to the panel and card base. 
I couldn't think of a sentiment, so I've left it for now...I wonder who this card will go to!


I hope you have enjoyed these videos and these cards!
If you have any questions, do leave me a comment.

Thanks so much for stopping by!
Have a great day!

Paru Mahtani
Paru's Perceptions!


Monday, December 18, 2017

More christmas cards

Hello!
I have some more Christmas cards for you today, which I have made using
Craftangles christmas stamps in combination with stamps and dies from other companies.

For the first card, I used the Christmas tree die from Stampendous and 
embossing folders from Cuttlebug. 
I saw this peekaboo style card on Instagram and was inspired by it. 
I first cut out the tree and the embossed the card panel. 
I then drew out the tree onto another panel of card stock and stamped the Santa image from the Craftangles 'Santa Claus' stamp set to fit into the tree. 
Once coloured the trimmed the stamped card stock to fit the embossed card stock and 
adhered them together using double sided foam tape.
I then stamped and cut the sentiment to fit at the base of the tree and 
finished the card by adding the red embossed panel and Craftangles metallic green sequins.


For the second card, I wanted to make something super quick and easy. 
I started by using the Impression Obsession door die to create and embossed background panel.
I then cut the lawn fawn mini wreath and bow to 'hang' on the door.
I then stamped the sentiment (from the Craftangles 'Seasons greetings stamp set) on matching white card stock and tore the edges to create some interest.
I finished the card with some self adhesive gemstones for some bling and shine!


The next two cards started out as experiment, which fortunately turned out well!!
For the first card, I stamped the Santa (Craftangles 'Merry Christmas' stamp set), onto kraft cardstock.
I then used Faber Castell colour pencils to colour the Santa and used a Stampin'Up blender pen to blend the colours. I then added the highlights and snow using a Signo white gel pen.
I finished the panel by adding a vellum panel with a white heat embossed sentiment 
from Lawn Fawn. 
I mounted the panel on a black card base...as you may have noticed, my current favourite thing to so this season!!


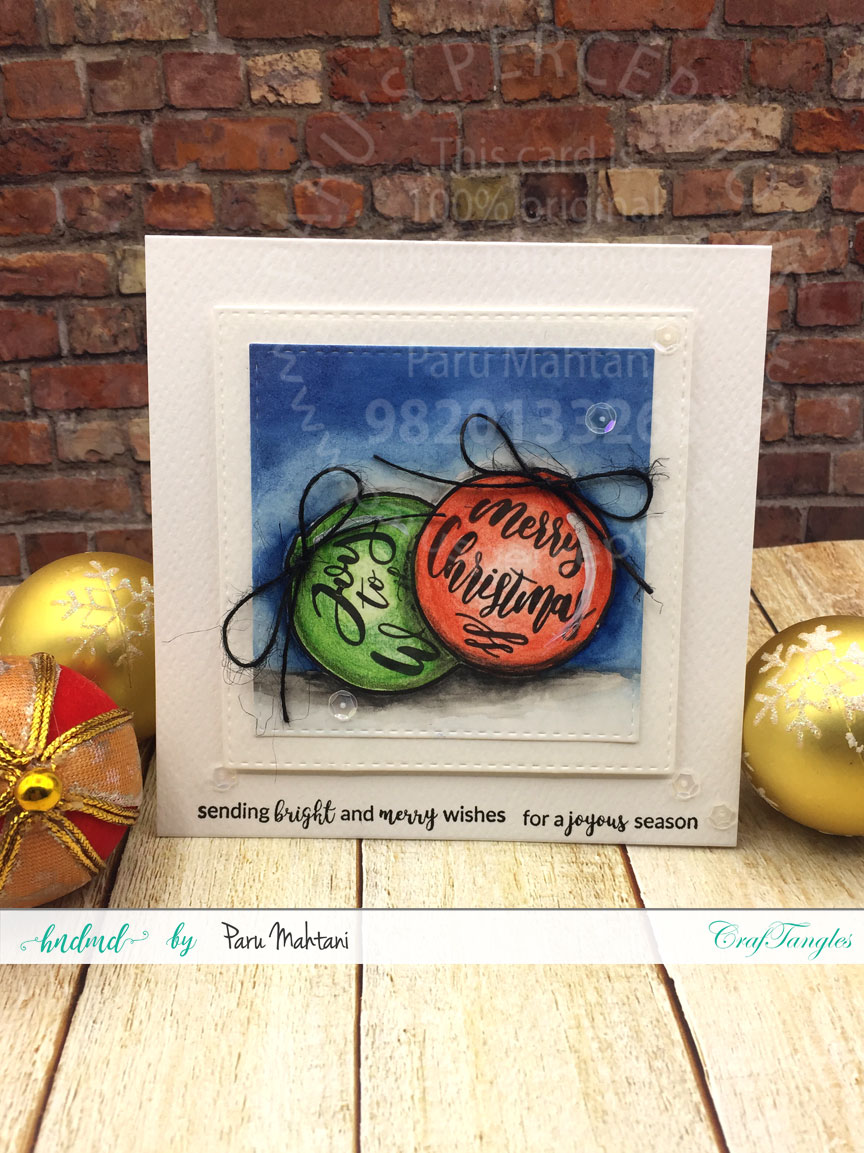
For the last card, I stamped and masked the Christmas ornament from the Craftangles 'Christmas ornament' stamp set on a piece of white card stock. I then stamped another ornament behind it.
I stamped the sentiments on the ornaments, and then coloured them with watercolours and watercolour pencils.
I then cut out the two panels using Simon Says Stamp stitched dies.
I then added a sentiment from the Craftangles 'seasons greetings' stamp set, 
which, I cut apart in order to stamp the entire sentiment in one line.
I then added some black jute twine to finish the card.
 I am submitting this card the Simon Says Stamp wednesday 'Stitch it' challenge.


I hope you enjoyed reading about my process and that you will give these stamps a try!
Thanks so much for stopping by!
Have a great day!


Saturday, November 4, 2017

Stamped and doodled deer

Hello!

I have three christmas mini notecards today, the inspiration for which was this image on instagram!

I used the deer stamp from Winnie and Walter's  'Winter Wonderland' Stamp set and using my Misti tool, I stamped the dear in pale shades of memento inks.
The inspiration design had an etched design on the deer, so I decided to recreate a similar design using my white Signo gel pen.
A cut square stitched dies using Simon Says Stamp dies and stamped the pine leaves (Winnie and Walter 'Winter Wonderland') on two of them and dry embossed the third.
I used Memento 'Summer Sky' ink around the edges and added some buttons and sequins(craftangles)
to add some interest.
I then adhered the deer to the panels (except card no 2..where I stamped the deer directly on the panel) and finished the cards by adhering the panels to a 3"x3" card base.
I absolutely love how they turned out!!


 I am submitting these cards for 


and the 

Thanks so much for stopping by!
Have a great day!
Paru Mahtani


Friday, April 14, 2017

Hnmd New release...Super heroes

Hello!
I am super thrilled to use HndMd's newly released ' Supergirls' 'Superboys' stamp and die sets, 'Birthday wishes' stamp set,  'Superkids' 6"x6" paper pack and the 'Filmstrip' die set!
I cannot say enough about the quality of the stamps and the dies!. The dies are super light and cut like butter through even 300 gsm cardstock (I used this for the film strip).
 The stamp quality is excellent and the impressions perfect!!
The papers are of fabulous quality, super luxurious and just the right thickness! 


For the first card , I stamped the superboy and super girl image as will as the super hero sentiment on some Bielo Cardstock. I then coloured the images using Steadler watercolour pencils and then blended the colours with a wet brush.

I used a patterned paper from the 'Superkids' paper pack as the background for my super heroes.
I finished the card with an anniversary sentiment from Hero Arts.


Wednesday, March 22, 2017

Patterned paper 3 ways

Hello!
For my post today I have used the 'We are pregnant' paper pack from Craftangles to make 3 cards.
I have used the non theme papers from the pack to make these cards.
I have tried to use them in different ways..I very happy with the results..I hope you like them too.

For the first card, I used left over scraps from earlier cards to stamp the sentiment.
I added a die cut cupcake from Concord and 9th and some sequins to finish the card.


Sunday, November 13, 2016

50th birthday shaker

 Hello !!

I am back with another shaker card...well, I am creating  shaker cards all this month, so you will see more in my next post too.

I made this card for my dearest cousin for her 50th birthday.
I used  a sheet from the Craftangles 'Pyari Ma' paper pack as the base of this card.
To create the shaker, I  stacked a few scalloped circles, 
covered them with acetate and created a well for the shaker elements. 
I then covered the other side too with acetate to create a see through shaker. 
The stack is no visible as it is on the inside of the card...actually this was a mistake I made..
but, doesn't look too bad, does it?


I had some number confetti in my stash which I added along with some rainbow coloured  and assorted sequins.


I finished the card with a die cut sentiment from Winnie and Walter. 
I ran this die cut sentiment through my Xyron sticker machine and adhered it to the acetate. 
The number die cuts are from Lawn Fawn's Quinns 123 die set.
I also stamped a sentiment on the inside of the card, which is visible through the shaker.

My cousin loved her card...hope you like it too.
Thanks for stopping by..
Have a great day!
Paru Mahtani


Wednesday, July 20, 2016

CrafTangles Stamps and Stencils are here!

Hello! 
Craft adda has launched its fabulous range of  Craftangles photopolymer stamps!
I have had the honour of using them and I have to tell you, the quality is exceptional!!!

I have used the 
to make this card.


I paired a couple of papers from this cute paper pack and stamped two sentiments from the stamp set.
To cover the joint I used a blue satin ribbon and added a button from  my stash.

Craft Adda have also released their Craftangles  stencils which are made from superb quality plastic.
Since the festival of Rakshabandhan is in a months time, I decided to make a card with a rakhi. 
I used the stencil to create a background for my starfish rakhi. 
I used Tim Holtz distress inks to create the soft background.
I created the sentiment using stamps from Paper Smooches (Kinfolk) and MFT (Graphic masculine T and Graphic feminine T)
I made a few cards so I used my Misti stamping tool which made it so very easy!
Jennnifer Mcguire demonstrates how, here...


I hope you will be inspired to go over to Craft Adda and check out their new releases!
Thanks for stopping by!
Have a great evening!


Friday, January 1, 2016

A baby guest book


Hello and Happy New year!

Today for my official Craft Adda blogpost,  I have a guest book that I made for a new baby.
Since we didn't know if it was going to be a boy or a girl, I decided to use a neutral colour like red and have the pages stamped in pink and blue on the inside.
 Its a simple book...I  cut some mount board to A5 size and covered it with some patterned paper.

I then created the label by printing it on the computer and cutting it down to size. I then layered it with more patterned paper and added the cute boy and girl charms to finish the cover.


To make the pages, I stamped baby motifs in pink and blue onto white cardstock. I then cut the pages to A5 size and go them bound together with the covers at my local stationery store.


We hope this inspires you to create a book of your own. 
If you have any questions or just love our work, please feel free to leave us a comment below!

Thanks so much for stopping by!
Have a great day!


Tuesday, December 29, 2015

Winter wonderland


Hey there! 
Of all the christmas cards I made this year, this one is my absolute favourite!

To make this card, I cut a square panel using the Simon Says Stamp stitched squares die and dry embossed it with the Cuttlebug folder.
I then placed the building die cut (from Paper Smooches) on the panel, added a spellbinders shapeabilities leaf, added the sentiment (from Hero Arts) and the card was done!
I adhered some yellow paper behind the windows of the building to bring some warmth to the image. 
To me it represents a winter wonderland!


Thanks so much for stopping by!
Have a great night!


Wednesday, June 3, 2015

Goodies from Craftadda!

Hi there!
I was so thrilled to receive my first DT package full of goodies  from CraftAdda, last week!
So, I sat down and had some fun with them!


For this card, I used the gorgeous printed papers and washi tape on brown card stock so as to make them pop!
I also added a the sparkly washi tape, just for a bit of interest.
I then die cut  the word Happy (from Winnie and Walter) from this panel. I then die cut the Happy a couple more times with white card stock so that I could raise the word and give it some dimension.
I then heat embossed  the sentiment, added some sequins and adhered the panel to a white card base.
Its the first time that I have tried this technique, and I am thrilled with the result!


For this cute tag, I used the same paper and wash tape as I used above, but not the sparkly tape.
I added a  butterfly button from my stash and stamped the sentiments (from Winnie and Walter) to finish  the card.
I created the black border for the ribbon hole using circle punches.


I've had a lot of fun…Hope I have inspired you to try out some of these awesome products from CraftAdda!

Thanks for stopping by!
Have a great day!

Wednesday, March 4, 2015

Circle Rose

Okay, last post for today!!!

Inspired by this rose that I saw on the awesome Ardyth Percy-Robb's blog, I made my own in ivory and gold ( hers is a lot more striking!)

I am playing the Runway Inspired Challenge-  Oscar Red Carpet and the RetroSketches challenge #155

Supplies used are…Spellbinders nesting circles, sentiment from Hampton Art, Versamark embossing ink and American Crafts gold embossing powder.


Thanks so much for stopping by!
Have a good night!

Thursday, May 1, 2014

Playing with Stencils

Hi everyone! I have been MIA for a while due to severe pain in the right shoulder and arm....Do any of you crafters face the same pain?

So, after a long time I have been able to make a few cards today. This is also my official Craft adda blogpost.

Stencilling is a big trend these days, so I decided to pull out my stencils which haven't seen the light of day in a while!


This gorgeous peacock feather stencil that I have used on the cards I made today is from Dreamweavers.

The inks that I have used are Tim holtz distress inks. I was thrilled with the effect they created!
the sentiments are from the Fiskars 'Curiosity' stamp set.

To create interest, I added the two butterflies...they are beads...so I decided to stick one down and leave the other loose so that it would move...its quite a fun surprise!

I am submitting this card for the Simon Says Stamp 'Anything Goes' Chalenge.

Thanks so much for stopping by!
Look out for some more stencil fun here on my blog!

Have a good night!